Continuous Integration and Delivery for Networking with Cisco devices

This post is about continuous integration and continuous delivery (CICD) for Cisco devices and how to use network simulation to test automation before deploying this to production environments. That was one of the main reasons for me to use Vagrant for simulating the network because the virtual environment can be created on-demand and thrown away after the scripts run successful. Please read before my post about Cisco network simulation using Vagrant: Cisco IOSv and XE network simulation using Vagrant and Cisco ASAv network simulation using Vagrant.

Same like in my first post about Continuous Integration and Delivery for Networking with Cumulus Linux, I am using Gitlab.com and their Gitlab-runner for the continuous integration and delivery (CICD) pipeline.

  • You need to register your Gitlab-runner with the Gitlab repository:

  • The next step is to create your .gitlab-ci.yml which defines your CI-pipeline.
---
stages:
    - validate ansible
    - staging iosv
    - staging iosxe
validate:
    stage: validate ansible
    script:
        - bash ./linter.sh
staging_iosv:
    before_script:
        - git clone https://github.com/berndonline/cisco-lab-vagrant.git
        - cd cisco-lab-vagrant/
        - cp Vagrantfile-IOSv Vagrantfile
    stage: staging iosv
    script:
        - bash ../staging.sh
staging_iosxe:
    before_script:
        - git clone https://github.com/berndonline/cisco-lab-vagrant.git
        - cd cisco-lab-vagrant/
        - cp Vagrantfile-IOSXE Vagrantfile
    stage: staging iosxe
    script:
        - bash ../staging.sh

I clone the cisco vagrant lab which I use to spin-up a virtual staging environment and run the Ansible playbook against the virtual lab. The stages IOSv and IOSXE are just examples in my case depending what Cisco IOS versions you want to test.

The production stage would be similar to staging only that you run the Ansible playbook against your physical environment.

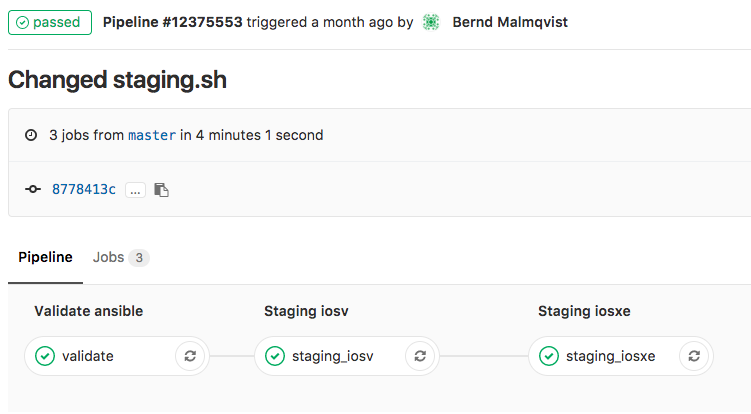
  • Basically any commit or merge in the Gitlab repo triggers the pipeline which is defined in the gitlab-ci.

  • The first stage is only to validate that the YAML files have the correct syntax.

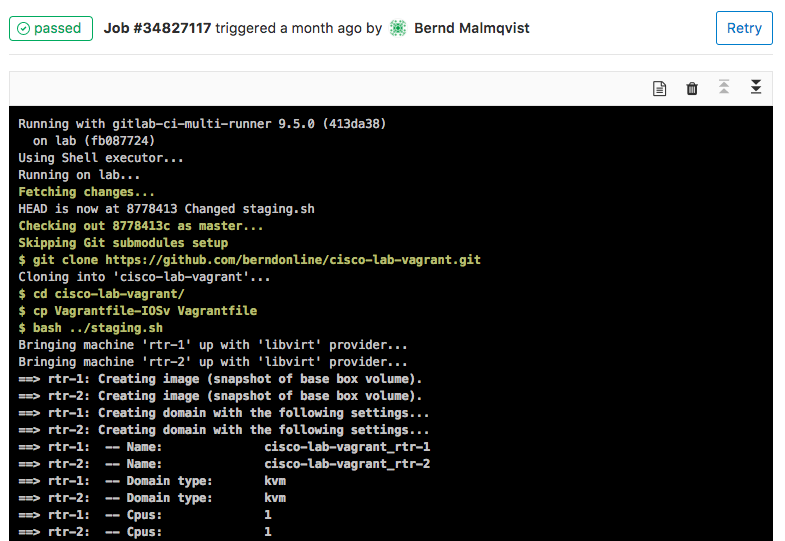
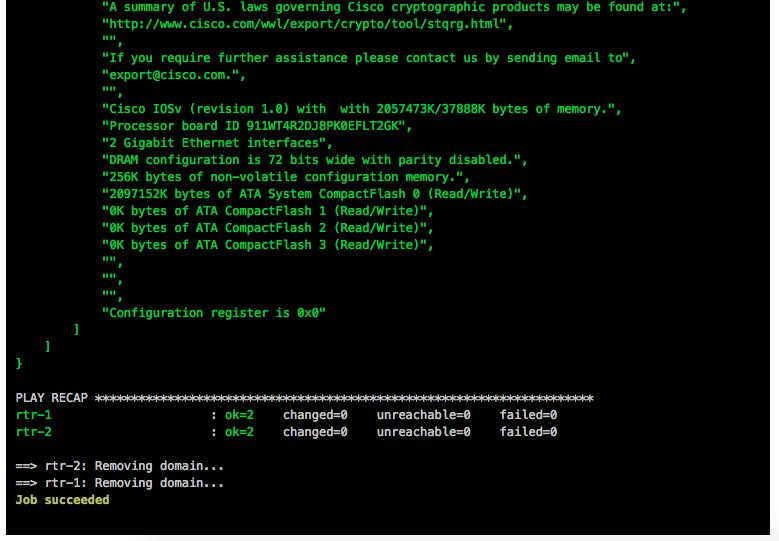
  • Here the details of a job and when everything goes well the job succeeded.

This is an easy way to test your Ansible playbooks against a virtual Cisco environment before deploying this to a production system.

Here again my two repositories I use:

https://github.com/berndonline/cisco-lab-vagrant

https://github.com/berndonline/cisco-lab-provision

Read my new posts about Ansible Playbook for Cisco ASAv Firewall Topology or Ansible Playbook for Cisco BGP Routing Topology.

Cisco ASAv network simulation using Vagrant

After creating IOSv and IOS XE Vagrant images, now doing the same for Cisco ASAv. Like in my last post same basic idea to create an simulated on-demand  network environment for continuous integration testing.

You need to buy the Cisco ASAv to get access to the KVM image on the Cisco website!

The Cisco ASAv is pretty easy because you can get QCOW2 images directly on the Cisco website, there are a few changes you need to do before you can use this together with Vagrant.

Boot the ASAv QCOW2 image on KVM and add the configuration below:

conf t
interface Management0/0
 nameif management
 security-level 0
 ip address dhcp
 no shutdown
 exit

hostname asa
domain-name lab.local
username vagrant password vagrant privilege 15
aaa authentication ssh console LOCAL
aaa authorization exec LOCAL auto-enable
ssh version 2
ssh timeout 60
ssh key-exchange group dh-group14-sha1
ssh 0 0 management

username vagrant attributes
  service-type admin
  ssh authentication publickey AAAAB3NzaC1yc2EAAAABIwAAAQEA6NF8iallvQVp22WDkTkyrtvp9eWW6A8YVr+kz4TjGYe7gHzIw+niNltGEFHzD8+v1I2YJ6oXevct1YeS0o9HZyN1Q9qgCgzUFtdOKLv6IedplqoPkcmF0aYet2PkEDo3MlTBckFXPITAMzF8dJSIFo9D8HfdOV0IAdx4O7PtixWKn5y2hMNG0zQPyUecp4pzC6kivAIhyfHilFR61RGL+GPXQ2MWZWFYbAGjyiYJnAmCP3NOTd0jMZEnDkbUvxhMmBYSdETk1rRgm+R4LOzFUGaHqHDLKLX+FIPKcF96hrucXzcWyLbIbEgE98OHlnVYCzRdK8jlqm8tehUc9c9WhQ==

Now the image is ready to use with Vagrant. Create an instance folder under the user vagrant directory and copy the QCOW2 image. As well create an metadata.json file:

mkdir -p ~/.vagrant.d/boxes/asav/0/libvirt/
cp ASAv.qcow2 ~/.vagrant.d/boxes/asav/0/libvirt/box.img
printf '{"provider":"libvirt","format":"qcow2","virtual_size":2}' > metadata.json

Create a Vagrantfile with the needed configuration and boot up the VMs. You have to start the VMs one by one.

berndonline@lab:~/asa-lab-vagrant$ vagrant status
Current machine states:

asa-1                     not created (libvirt)
asa-2                     not created (libvirt)

This environment represents multiple VMs. The VMs are all listed
above with their current state. For more information about a specific
VM, run `vagrant status NAME`.
berndonline@lab:~/asa-lab-vagrant$ vagrant up asa-1
Bringing machine 'asa-1' up with 'libvirt' provider...
==> asa-1: Creating image (snapshot of base box volume).
==> asa-1: Creating domain with the following settings...
==> asa-1:  -- Name:              asa-lab-vagrant_asa-1
==> asa-1:  -- Domain type:       kvm
==> asa-1:  -- Cpus:              1
==> asa-1:  -- Feature:           acpi
==> asa-1:  -- Feature:           apic
==> asa-1:  -- Feature:           pae
==> asa-1:  -- Memory:            2048M
==> asa-1:  -- Management MAC:
==> asa-1:  -- Loader:
==> asa-1:  -- Base box:          asav
==> asa-1:  -- Storage pool:      default
==> asa-1:  -- Image:             /var/lib/libvirt/images/asa-lab-vagrant_asa-1.img (8G)
==> asa-1:  -- Volume Cache:      default
==> asa-1:  -- Kernel:
==> asa-1:  -- Initrd:
==> asa-1:  -- Graphics Type:     vnc
==> asa-1:  -- Graphics Port:     5900
==> asa-1:  -- Graphics IP:       127.0.0.1
==> asa-1:  -- Graphics Password: Not defined
==> asa-1:  -- Video Type:        cirrus
==> asa-1:  -- Video VRAM:        9216
==> asa-1:  -- Sound Type:
==> asa-1:  -- Keymap:            en-us
==> asa-1:  -- TPM Path:
==> asa-1:  -- INPUT:             type=mouse, bus=ps2
==> asa-1: Creating shared folders metadata...
==> asa-1: Starting domain.
==> asa-1: Waiting for domain to get an IP address...
==> asa-1: Waiting for SSH to become available...
==> asa-1: Configuring and enabling network interfaces...
    asa-1: SSH address: 10.255.1.238:22
    asa-1: SSH username: vagrant
    asa-1: SSH auth method: private key
    asa-1: Warning: Connection refused. Retrying...
==> asa-1: Running provisioner: ansible...
    asa-1: Running ansible-playbook...

PLAY [all] *********************************************************************

PLAY RECAP *********************************************************************

berndonline@lab:~/asa-lab-vagrant$ vagrant up asa-2
Bringing machine 'asa-2' up with 'libvirt' provider...
==> asa-2: Creating image (snapshot of base box volume).
==> asa-2: Creating domain with the following settings...
==> asa-2:  -- Name:              asa-lab-vagrant_asa-2
==> asa-2:  -- Domain type:       kvm
==> asa-2:  -- Cpus:              1
==> asa-2:  -- Feature:           acpi
==> asa-2:  -- Feature:           apic
==> asa-2:  -- Feature:           pae
==> asa-2:  -- Memory:            2048M
==> asa-2:  -- Management MAC:
==> asa-2:  -- Loader:
==> asa-2:  -- Base box:          asav
==> asa-2:  -- Storage pool:      default
==> asa-2:  -- Image:             /var/lib/libvirt/images/asa-lab-vagrant_asa-2.img (8G)
==> asa-2:  -- Volume Cache:      default
==> asa-2:  -- Kernel:
==> asa-2:  -- Initrd:
==> asa-2:  -- Graphics Type:     vnc
==> asa-2:  -- Graphics Port:     5900
==> asa-2:  -- Graphics IP:       127.0.0.1
==> asa-2:  -- Graphics Password: Not defined
==> asa-2:  -- Video Type:        cirrus
==> asa-2:  -- Video VRAM:        9216
==> asa-2:  -- Sound Type:
==> asa-2:  -- Keymap:            en-us
==> asa-2:  -- TPM Path:
==> asa-2:  -- INPUT:             type=mouse, bus=ps2
==> asa-2: Creating shared folders metadata...
==> asa-2: Starting domain.
==> asa-2: Waiting for domain to get an IP address...
==> asa-2: Waiting for SSH to become available...
==> asa-2: Configuring and enabling network interfaces...
    asa-2: SSH address: 10.255.1.131:22
    asa-2: SSH username: vagrant
    asa-2: SSH auth method: private key
==> asa-2: Running provisioner: ansible...
    asa-2: Running ansible-playbook...

PLAY [all] *********************************************************************

PLAY RECAP *********************************************************************

berndonline@lab:~/asa-lab-vagrant$ vagrant status
Current machine states:

asa-1                     running (libvirt)
asa-2                     running (libvirt)

berndonline@lab:~/asa-lab-vagrant$

After the VMs are successfully booted you can connect with vagrant ssh:

berndonline@lab:~/asa-lab-vagrant$ vagrant ssh asa-1
Type help or '?' for a list of available commands.
asa# show version

Cisco Adaptive Security Appliance Software Version 9.6(2)
Device Manager Version 7.6(2)

Compiled on Tue 23-Aug-16 18:38 PDT by builders
System image file is "boot:/asa962-smp-k8.bin"
Config file at boot was "startup-config"

asa up 10 mins 31 secs

Hardware:   ASAv, 2048 MB RAM, CPU Xeon E5 series 3600 MHz,
Model Id:   ASAv10
Internal ATA Compact Flash, 8192MB
Slot 1: ATA Compact Flash, 8192MB
BIOS Flash Firmware Hub @ 0x0, 0KB

....

Configuration has not been modified since last system restart.
asa# exit

Logoff

Connection to 10.255.1.238 closed by remote host.
Connection to 10.255.1.238 closed.
berndonline@lab:~/asa-lab-vagrant$ vagrant destroy
==> asa-2: Removing domain...
==> asa-2: Running triggers after destroy...
Removing known host entries
==> asa-1: Removing domain...
==> asa-1: Running triggers after destroy...
Removing known host entries
berndonline@lab:~/asa-lab-vagrant$

Here I have a virtual ASAv environment which I can spin-up and down as needed for automation testing.

The example Vagrantfile you can find in my Github repository:

https://github.com/berndonline/asa-lab-vagrant/blob/master/Vagrantfile

Read my new post about an Ansible Playbook for Cisco ASAv Firewall Topology

Cisco ASA and IOS-XE embedded packet capturing

This is a short post about a step-by-step procedure to configure packet capturing on Cisco ASA or IOS XE using the CLI.

Cisco ASA embedded packet capturing:

access-list acl_capin extended permit ip host 217.100.100.254 host 10.0.255.254
access-list acl_capin extended permit ip host 10.0.255.254 host 217.100.100.254
capture capin interface inside access-list acl_capin

or

capture capin interface inside match ip host 10.0.255.254 host 217.100.100.254
[possible in asa 8.x and later]

Show captured packets:

asa-1(config)#  show capture capin

10 packets captured

   1: 15:11:12.760092       10.0.255.254 > 217.100.100.254: icmp: echo request
   2: 15:11:12.761755       217.100.100.254 > 10.0.255.254: icmp: echo reply
   3: 15:11:12.764196       10.0.255.254 > 217.100.100.254: icmp: echo request
   4: 15:11:12.765615       217.100.100.254 > 10.0.255.254: icmp: echo reply
   5: 15:11:12.768072       10.0.255.254 > 217.100.100.254: icmp: echo request
   6: 15:11:12.769354       217.100.100.254 > 10.0.255.254: icmp: echo reply
   7: 15:11:12.771612       10.0.255.254 > 217.100.100.254: icmp: echo request
   8: 15:11:12.773077       217.100.100.254 > 10.0.255.254: icmp: echo reply
   9: 15:11:12.775548       10.0.255.254 > 217.100.100.254: icmp: echo request
  10: 15:11:12.777150       217.100.100.254 > 10.0.255.254: icmp: echo reply
10 packets shown

asa-1(config)#

asa-1(config)#  show capture capinside detail

20 packets captured

   1: 15:11:12.760092 a000.0000.0001 a000.0000.0021 0x0800 Length: 114
      10.0.255.254 > 217.100.100.254: icmp: echo request (ttl 255, id 5)
   2: 15:11:12.761755 a000.0000.0021 a000.0000.0001 0x0800 Length: 114
      217.100.100.254 > 10.0.255.254: icmp: echo reply (ttl 255, id 5)
   3: 15:11:12.764196 a000.0000.0001 a000.0000.0021 0x0800 Length: 114
      10.0.255.254 > 217.100.100.254: icmp: echo request (ttl 255, id 6)
   4: 15:11:12.765615 a000.0000.0021 a000.0000.0001 0x0800 Length: 114
      217.100.100.254 > 10.0.255.254: icmp: echo reply (ttl 255, id 6)
   5: 15:11:12.768072 a000.0000.0001 a000.0000.0021 0x0800 Length: 114
      10.0.255.254 > 217.100.100.254: icmp: echo request (ttl 255, id 7)
   6: 15:11:12.769354 a000.0000.0021 a000.0000.0001 0x0800 Length: 114
      217.100.100.254 > 10.0.255.254: icmp: echo reply (ttl 255, id 7)
   7: 15:11:12.771612 a000.0000.0001 a000.0000.0021 0x0800 Length: 114
      10.0.255.254 > 217.100.100.254: icmp: echo request (ttl 255, id 8)
   8: 15:11:12.773077 a000.0000.0021 a000.0000.0001 0x0800 Length: 114
      217.100.100.254 > 10.0.255.254: icmp: echo reply (ttl 255, id 8)
   9: 15:11:12.775548 a000.0000.0001 a000.0000.0021 0x0800 Length: 114
      10.0.255.254 > 217.100.100.254: icmp: echo request (ttl 255, id 9)
  10: 15:11:12.777150 a000.0000.0021 a000.0000.0001 0x0800 Length: 114
      217.100.100.254 > 10.0.255.254: icmp: echo reply (ttl 255, id 9)
20 packets shown

asa-1(config)#
Browser capture:
https://10.255.1.203/admin/capture/capin

Download pcap:
https://10.255.1.203/capture/capin/pcap

Disable capture and remove access-list:

no capture capin
no capture capout
clear configure access-list acl_capin
clear configure access-list acl_capout

Cisco ASR embedded packet capturing:

ip access-list extended acl_cap
 permit ip any any
 permit icmp any any
 exit
 
monitor capture mycap access-list acl_cap 
monitor capture mycap limit duration 1000
monitor capture mycap interface GigabitEthernet3 both
monitor capture mycap buffer circular size 10
monitor capture mycap start
monitor capture mycap export tftp://10.255.1.87/mycap.pcap

Show captured packets:

rtr-2#show monitor capture mycap buffer dump
0
  0000:  A0000000 0004A000 00000001 08004500   ..............E.
  0010:  00640041 0000FF01 A9530A00 FF010A00   .d.A.....S......
  0020:  FF020800 0B62000D 00000000 0000001E   .....b..........
  0030:  72BDABCD ABCDABCD ABCDABCD ABCDABCD   r...............
  0040:  ABCDABCD ABCDABCD ABCDABCD ABCDABCD   ................
  0050:  ABCDABCD ABCDABCD ABCDABCD ABCDABCD   ................
  0060:  ABCDABCD ABCDABCD ABCDABCD ABCDABCD   ................
  0070:  ABCD                                  ..

1
  0000:  A0000000 0001A000 00000004 08004500   ..............E.
  0010:  00640041 0000FF01 A9530A00 FF020A00   .d.A.....S......
  0020:  FF010000 1362000D 00000000 0000001E   .....b..........
  0030:  72BDABCD ABCDABCD ABCDABCD ABCDABCD   r...............
  0040:  ABCDABCD ABCDABCD ABCDABCD ABCDABCD   ................
  0050:  ABCDABCD ABCDABCD ABCDABCD ABCDABCD   ................
  0060:  ABCDABCD ABCDABCD ABCDABCD ABCDABCD   ................
  0070:  ABCD                                  ..
...

rtr-2#show monitor capture mycap buffer
 buffer size (KB) : 10240
 buffer used (KB) : 128
 packets in buf   : 14
 packets dropped  : 0
 packets per sec  : 1
...

Disable capture and remove access-list:

monitor capture mycap stop
no monitor capture mycap
no ip access-list extended acl_cap