Using Kubernetes Impersonate (sudo) for least-privilege

It has become very easy and simple to deploy Kubernetes services using the various cloud offerings like EKS or GKE, after you created your cluster and have the cluster-admin privileges to apply changes as you like. This model is great for development because you can start consuming Kubernetes services right away but this doesn’t work well for production clusters and gets more challenging when running PCI compliant workloads.

I want to explain a bit how to apply a least-privilege principle for Elastic Kubernetes Services (EKS) using the AWS integrated IAM. The diagram below is a simple example showing two IAM roles for admin and reader privileges for AWS resources. On the Kubernetes cluster the IAM roles are bound to the k8s cluster-admin and reader roles. The k8s sudoer role allows to impersonate cluster-admin privileges for cluster readers:

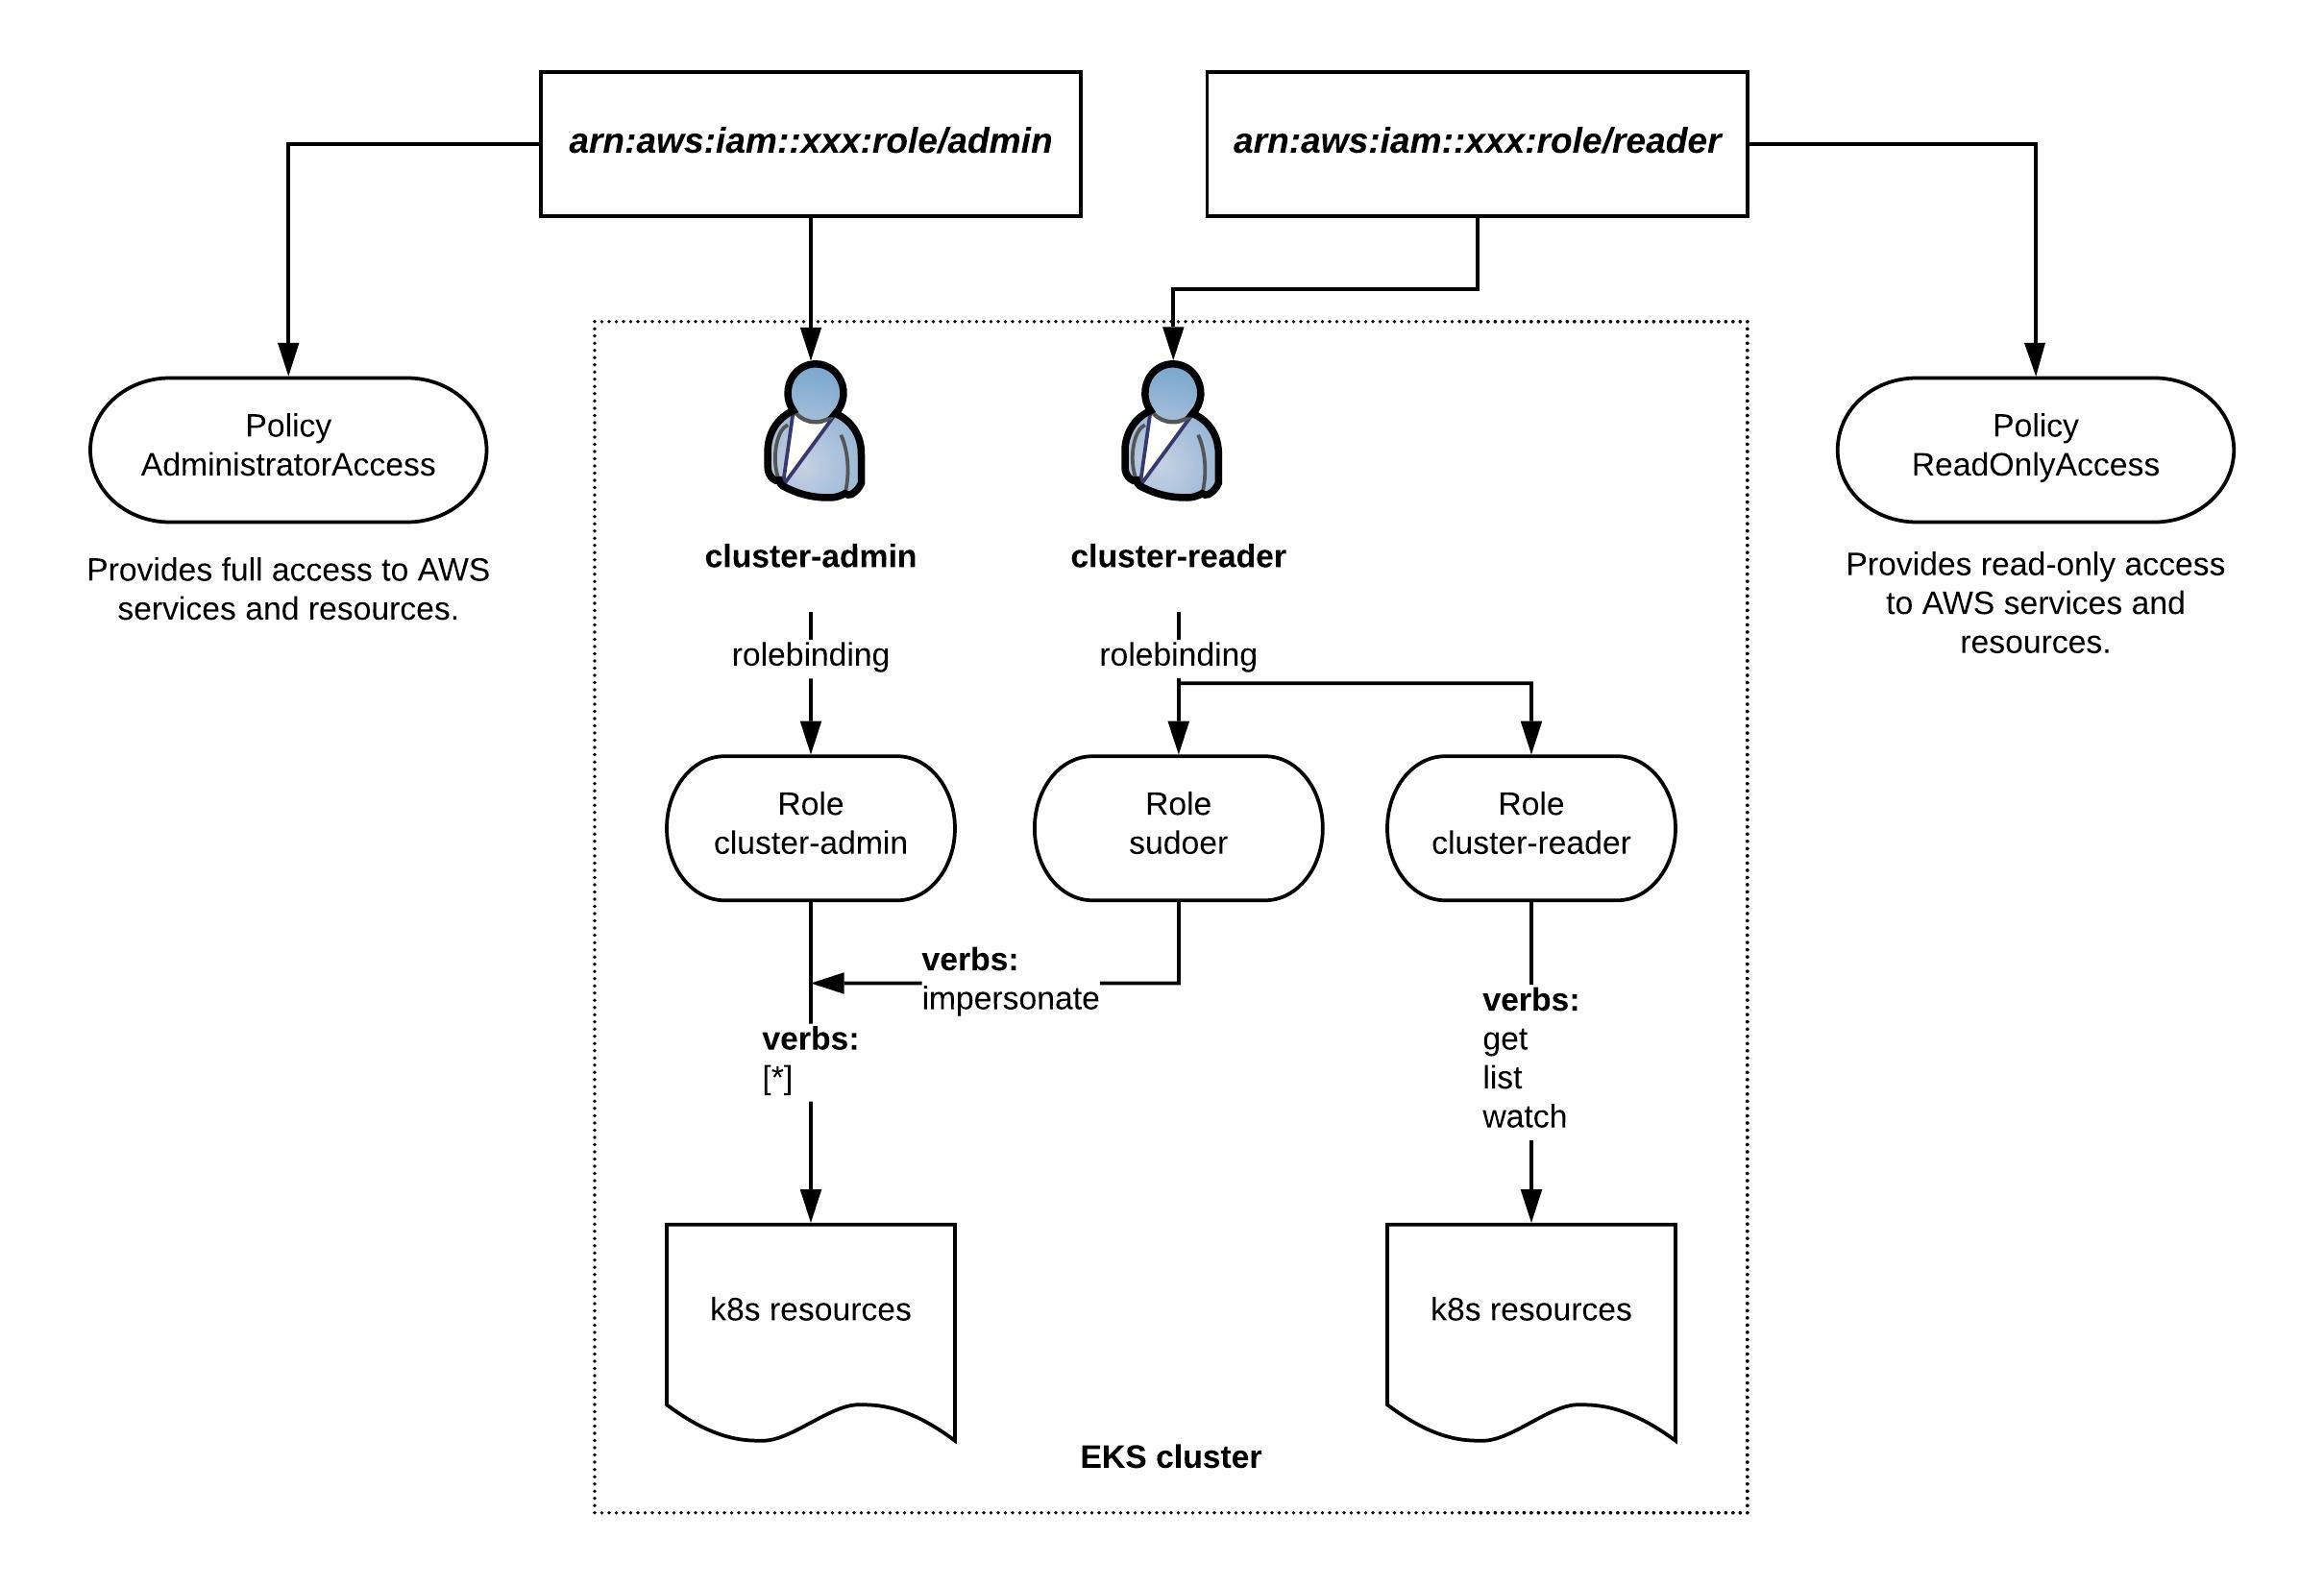
Normally you would add your DevOps team to the IAM reader role. This way the DevOps team has the default read permissions for AWS and Kubernetes resources but they can also elevate Kubernetes permissions to cluster-admin level when required without having full access to the AWS resources.

Let’s look at the EKS aws-auth ConfigMap where you need to define the IAM role mapping for admin and reader to internal Kubernetes groups:

apiVersion: v1
kind: ConfigMap
metadata:
  name: aws-auth
  namespace: kube-system
data:
  mapRoles: |
    - rolearn: arn:aws:iam::xxx:role/admin
      username: cluster-admin
      groups:
        - system:masters
    - rolearn: arn:aws:iam::xxx:role/reader
      username: cluster-reader
      groups:
        - cluster-reader
    - rolearn: arn:aws:iam::555555555555:role/devel-worker-nodes-NodeInstanceRole-74RF4UBDUKL6
      username: system:node:{{EC2PrivateDNSName}}
      groups:
        - system:bootstrappers
        - system:nodes
  mapUsers: |
    []

The system:masters group is a Kubernetes default role and rolebinding and requires no additional configuration. For the cluster-reader we need to apply a ClusterRole and a ClusterRoleBinding:

apiVersion: rbac.authorization.k8s.io/v1
kind: ClusterRole
metadata:
  name: cluster-reader
rules:
- apiGroups:
  - ""
  resources:
  - componentstatuses
  - nodes
  - nodes/status
  - persistentvolumeclaims/status
  - persistentvolumes
  - persistentvolumes/status
  - pods/binding
  - pods/eviction
  - podtemplates
  - securitycontextconstraints
  - services/status
  verbs:
  - get
  - list
  - watch
- apiGroups:
  - admissionregistration.k8s.io
  resources:
  - mutatingwebhookconfigurations
  - validatingwebhookconfigurations
  verbs:
  - get
  - list
  - watch
- apiGroups:
  - apps
  resources:
  - controllerrevisions
  - daemonsets/status
  - deployments/status
  - replicasets/status
  - statefulsets/status
  verbs:
  - get
  - list
  - watch
- apiGroups:
  - apiextensions.k8s.io
  resources:
  - customresourcedefinitions
  - customresourcedefinitions/status
  verbs:
  - get
  - list
  - watch
- apiGroups:
  - apiregistration.k8s.io
  resources:
  - apiservices
  - apiservices/status
  verbs:
  - get
  - list
  - watch
- apiGroups:
  - autoscaling
  resources:
  - horizontalpodautoscalers/status
  verbs:
  - get
  - list
  - watch
- apiGroups:
  - batch
  resources:
  - cronjobs/status
  - jobs/status
  verbs:
  - get
  - list
  - watch
- apiGroups:
  - coordination.k8s.io
  resources:
  - leases
  verbs:
  - get
  - list
  - watch
- apiGroups:
  - extensions
  resources:
  - daemonsets/status
  - deployments/status
  - horizontalpodautoscalers
  - horizontalpodautoscalers/status
  - ingresses/status
  - jobs
  - jobs/status
  - podsecuritypolicies
  - replicasets/status
  - replicationcontrollers
  - storageclasses
  - thirdpartyresources
  verbs:
  - get
  - list
  - watch
- apiGroups:
  - events.k8s.io
  resources:
  - events
  verbs:
  - get
  - list
  - watch
- apiGroups:
  - policy
  resources:
  - poddisruptionbudgets/status
  - podsecuritypolicies
  verbs:
  - get
  - list
  - watch
- apiGroups:
  - rbac.authorization.k8s.io
  resources:
  - clusterrolebindings
  - clusterroles
  - rolebindings
  - roles
  verbs:
  - get
  - list
  - watch
- apiGroups:
  - settings.k8s.io
  resources:
  - podpresets
  verbs:
  - get
  - list
  - watch
- apiGroups:
  - storage.k8s.io
  resources:
  - storageclasses
  - volumeattachments
  - volumeattachments/status
  verbs:
  - get
  - list
  - watch
- apiGroups:
  - scheduling.k8s.io
  resources:
  - priorityclasses
  verbs:
  - get
  - list
  - watch
- apiGroups:
  - certificates.k8s.io
  resources:
  - certificatesigningrequests
  - certificatesigningrequests/approval
  - certificatesigningrequests/status
  verbs:
  - get
  - list
  - watch
- apiGroups:
  - authorization.k8s.io
  resources:
  - localsubjectaccessreviews
  - selfsubjectaccessreviews
  - selfsubjectrulesreviews
  - subjectaccessreviews
  verbs:
  - create
- apiGroups:
  - authentication.k8s.io
  resources:
  - tokenreviews
  verbs:
  - create
- apiGroups:
  - ""
  resources:
  - podsecuritypolicyreviews
  - podsecuritypolicyselfsubjectreviews
  - podsecuritypolicysubjectreviews
  verbs:
  - create
- apiGroups:
  - ""
  resources:
  - nodes/metrics
  - nodes/spec
  verbs:
  - get
- apiGroups:
  - ""
  resources:
  - nodes/stats
  verbs:
  - create
  - get
- nonResourceURLs:
  - '*'
  verbs:
  - get
- apiGroups:
  - networking.k8s.io
  resources:
  - ingresses/status
  verbs:
  - get
- apiGroups:
  - networking.k8s.io
  resources:
  - ingresses/status
  verbs:
  - list
- apiGroups:
  - networking.k8s.io
  resources:
  - ingresses/status
  verbs:
  - watch
- apiGroups:
  - node.k8s.io
  resources:
  - runtimeclasses
  verbs:
  - get
- apiGroups:
  - node.k8s.io
  resources:
  - runtimeclasses
  verbs:
  - list
- apiGroups:
  - node.k8s.io
  resources:
  - runtimeclasses
  verbs:
  - watch
- apiGroups:
  - storage.k8s.io
  resources:
  - csidrivers
  verbs:
  - get
- apiGroups:
  - storage.k8s.io
  resources:
  - csidrivers
  verbs:
  - list
- apiGroups:
  - storage.k8s.io
  resources:
  - csidrivers
  verbs:
  - watch
- apiGroups:
  - storage.k8s.io
  resources:
  - csinodes
  verbs:
  - get
- apiGroups:
  - storage.k8s.io
  resources:
  - csinodes
  verbs:
  - list
- apiGroups:
  - storage.k8s.io
  resources:
  - csinodes
  verbs:
  - watch
- apiGroups:
  - operators.coreos.com
  resources:
  - clusterserviceversions
  - catalogsources
  - installplans
  - subscriptions
  - operatorgroups
  verbs:
  - get
  - list
  - watch
- apiGroups:
  - packages.operators.coreos.com
  resources:
  - packagemanifests
  - packagemanifests/icon
  verbs:
  - get
  - list
  - watch
- apiGroups:
  - packages.operators.coreos.com
  resources:
  - packagemanifests
  verbs:
  - get
  - list
  - watch
- apiGroups:
  - ""
  resources:
  - namespaces
  verbs:
  - get
- apiGroups:
  - ""
  resources:
  - configmaps
  - endpoints
  - persistentvolumeclaims
  - pods
  - replicationcontrollers
  - replicationcontrollers/scale
  - serviceaccounts
  - services
  verbs:
  - get
  - list
  - watch
- apiGroups:
  - ""
  resources:
  - bindings
  - events
  - limitranges
  - namespaces/status
  - pods/log
  - pods/status
  - replicationcontrollers/status
  - resourcequotas
  - resourcequotas/status
  verbs:
  - get
  - list
  - watch
- apiGroups:
  - ""
  resources:
  - namespaces
  verbs:
  - get
  - list
  - watch
- apiGroups:
  - apps
  resources:
  - controllerrevisions
  - daemonsets
  - deployments
  - deployments/scale
  - replicasets
  - replicasets/scale
  - statefulsets
  - statefulsets/scale
  verbs:
  - get
  - list
  - watch
- apiGroups:
  - autoscaling
  resources:
  - horizontalpodautoscalers
  verbs:
  - get
  - list
  - watch
- apiGroups:
  - batch
  resources:
  - cronjobs
  - jobs
  verbs:
  - get
  - list
  - watch
- apiGroups:
  - extensions
  resources:
  - daemonsets
  - deployments
  - deployments/scale
  - ingresses
  - networkpolicies
  - replicasets
  - replicasets/scale
  - replicationcontrollers/scale
  verbs:
  - get
  - list
  - watch
- apiGroups:
  - policy
  resources:
  - poddisruptionbudgets
  verbs:
  - get
  - list
  - watch
- apiGroups:
  - networking.k8s.io
  resources:
  - networkpolicies
  verbs:
  - get
  - list
  - watch
- apiGroups:
  - networking.k8s.io
  resources:
  - ingresses
  verbs:
  - get
- apiGroups:
  - networking.k8s.io
  resources:
  - ingresses
  verbs:
  - list
- apiGroups:
  - networking.k8s.io
  resources:
  - ingresses
  verbs:
  - watch
- apiGroups:
  - metrics.k8s.io
  resources:
  - pods
  verbs:
  - get
  - list
  - watch
- apiGroups:
  - ""
  resources:
  - resourcequotausages
  verbs:
  - get
  - list
  - watch

After you created the ClusterRole you need to create the ClusterRoleBinding:

apiVersion: rbac.authorization.k8s.io/v1
kind: ClusterRoleBinding
metadata:
  name: cluster-reader
roleRef:
  apiGroup: rbac.authorization.k8s.io
  kind: ClusterRole
  name: cluster-reader
subjects:
- apiGroup: rbac.authorization.k8s.io
  kind: Group
  name: cluster-reader

To give a cluster-reader impersonate permissions you need to create the sudoer ClusterRole with the right to impersonate system:admin:

apiVersion: rbac.authorization.k8s.io/v1
kind: ClusterRole
metadata:
  name: sudoer
rules:
- apiGroups:
  - ""
  resourceNames:
  - system:admin
  resources:
  - systemusers
  - users
  verbs:
  - impersonate
- apiGroups:
  - ""
  resourceNames:
  - system:masters
  resources:
  - groups
  - systemgroups
  verbs:
  - impersonate

Create the ClusterRoleBinding:

apiVersion: rbac.authorization.k8s.io/v1
kind: ClusterRoleBinding
metadata:
  name: sudoer
roleRef:
  apiGroup: rbac.authorization.k8s.io
  kind: ClusterRole
  name: sudoer
subjects:
- apiGroup: rbac.authorization.k8s.io
  kind: Group
  name: cluster-reader

For a cluster-reader to impersonate and get cluster-admin privileges you use the following kubectl options –as-group and –as:

kubectl get nodes --as-group system:masters --as system:admin

You want to restrict the membership of the IAM admin role as much as possible as everyone should only use the read permissions to not accidentally delete Kubernetes or AWS resources.

OpenShift Hive – API driven OpenShift cluster provisioning and management operator

RedHat invited me and my colleague Matt to speak at RedHat OpenShift Commons in London about the API driven OpenShift cluster provisioning and management operator called OpenShift Hive. We have been using OpenShift Hive for the past few months to provision and manage the OpenShift 4 estate across multiple environments. Below the video recording of our talk at OpenShift Commons London:

The Hive operator requires to run on a separate Kubernetes cluster to centrally provision and manage the OpenShift 4 clusters. With Hive you can manage hundreds of cluster deployments and configuration with a single operator. There is nothing required on the OpenShift 4 clusters itself, Hive only requires access to the cluster API:

The ClusterDeployment custom resource is the definition for the cluster specs, similar to the openshift-installer install-config where you define cluster specifications, cloud credential and image pull secrets. Below is an example of the ClusterDeployment manifest:

---
apiVersion: hive.openshift.io/v1
kind: ClusterDeployment
metadata:
  name: mycluster
  namespace: mynamespace
spec:
  baseDomain: hive.example.com
  clusterName: mycluster
  platform:
    aws:
      credentialsSecretRef:
        name: mycluster-aws-creds
      region: eu-west-1
  provisioning:
    imageSetRef:
      name: openshift-v4.3.0
    installConfigSecretRef:
      name: mycluster-install-config
    sshPrivateKeySecretRef:
      name: mycluster-ssh-key
  pullSecretRef:
    name: mycluster-pull-secret

The SyncSet custom resource is defining the configuration and is able to regularly reconcile the manifests to keep all clusters synchronised. With SyncSets you can apply resources and patches as you see in the example below:

---
apiVersion: hive.openshift.io/v1
kind: SyncSet
metadata:
  name: mygroup
spec:
  clusterDeploymentRefs:
  - name: ClusterName
  resourceApplyMode: Upsert
  resources:
  - apiVersion: user.openshift.io/v1
    kind: Group
    metadata:
      name: mygroup
    users:
    - myuser
  patches:
  - kind: ConfigMap
    apiVersion: v1
    name: foo
    namespace: default
    patch: |-
      { "data": { "foo": "new-bar" } }
    patchType: merge
  secretReferences:
  - source:
      name: ad-bind-password
      namespace: default
    target:
      name: ad-bind-password
      namespace: openshift-config

Depending of the amount of resource and patches you want to apply, a SyncSet can get pretty large and is not very easy to manage. My colleague Matt wrote a SyncSet Generator, please check this Github repository.

In one of my next articles I will go into more detail on how to deploy OpenShift Hive and I’ll provide more examples of how to use ClusterDeployment and SyncSets. In the meantime please check out the OpenShift Hive repository for more details, additionally here are links to the Hive documentation on using Hive and Syncsets.

Read my new article about installing OpenShift Hive.

How to manage Kubernetes clusters the GitOps way with Flux CD

Kubernetes is becoming more and more popular, and so is managing clusters at scale. This article is about how to manage Kubernetes clusters the GitOps way using the Flux CD operator.

Flux can monitor container image and code repositories that you specify and trigger deployments to automatically change the configuration state of your Kubernetes cluster. The cluster configuration is centrally managed and stored in declarative form in Git, and there is no need for an administrator to manually apply manifests, the Flux operator synchronise to apply or delete the cluster configuration.

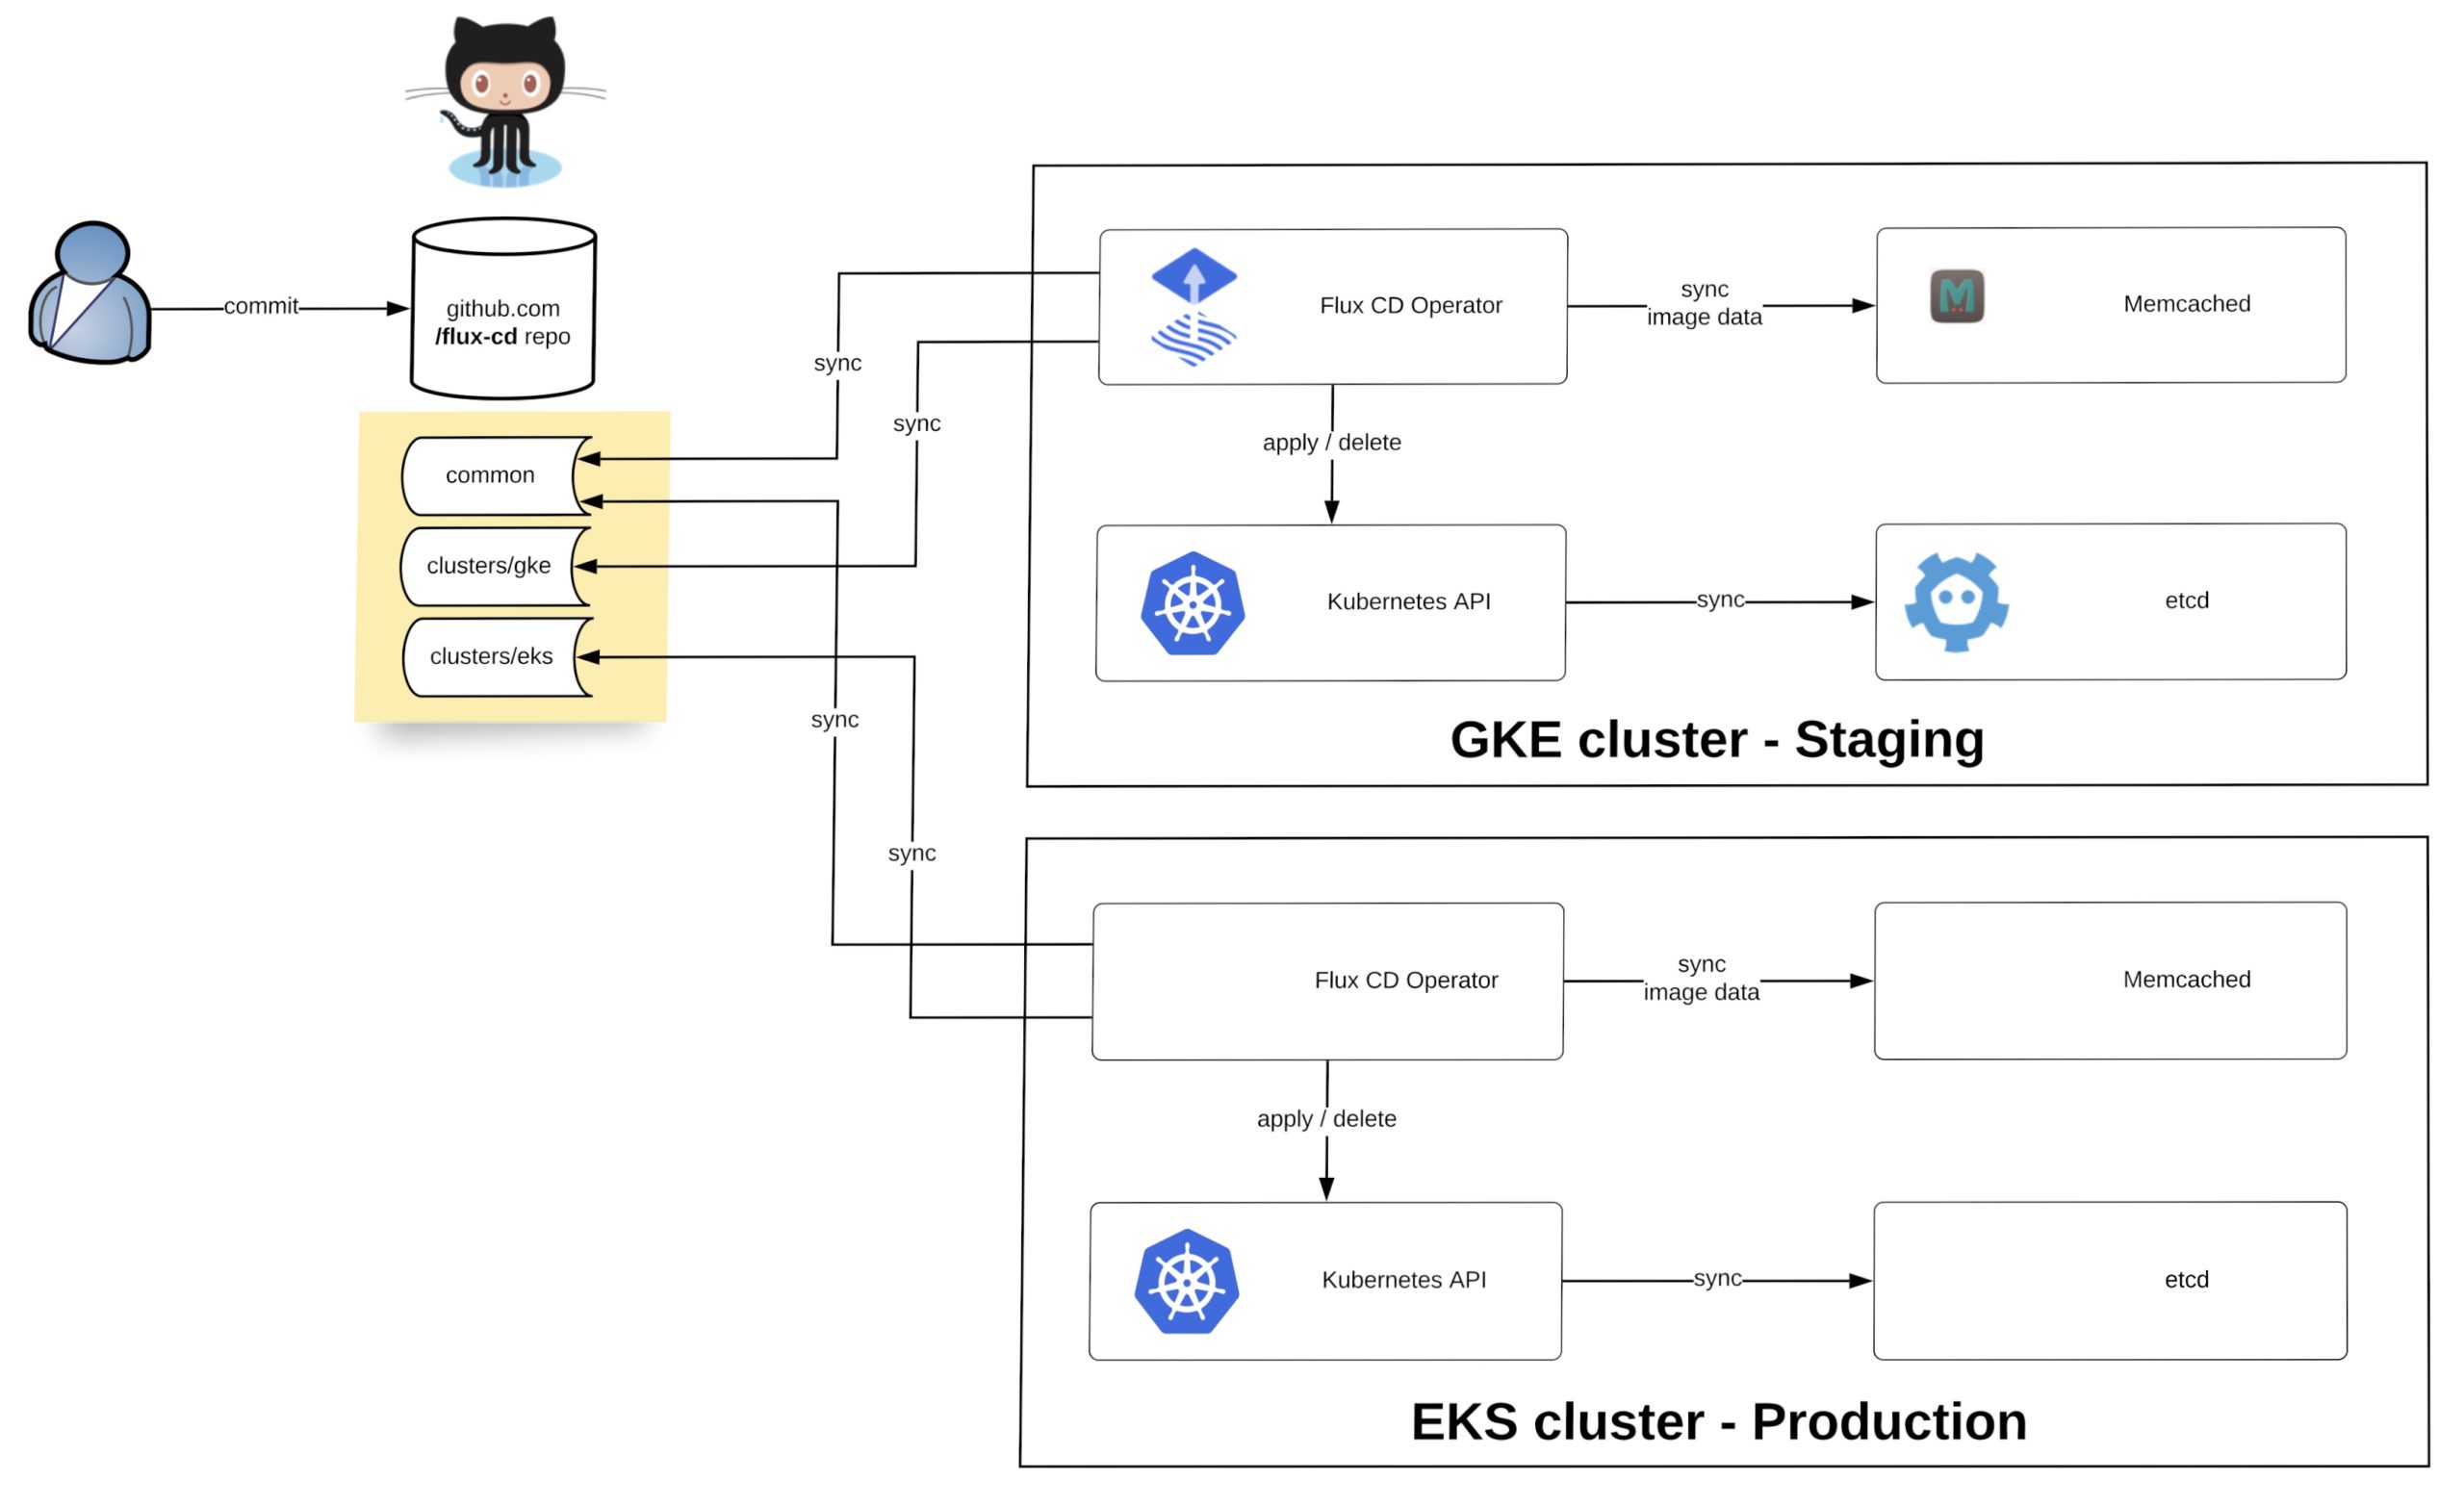
Before we start deploying the operator we need to install the fluxctl command-line utility and create the namespace:

sudo wget -O /usr/local/bin/fluxctl https://github.com/fluxcd/flux/releases/download/1.18.0/fluxctl_linux_amd64
sudo chmod 755 /usr/local/bin/fluxctl
kubectl create ns flux

Deploying the Flux operator is straight forward and requires a few options like git repository and git path. The path is important for my example because it tells the operator in which folder to look for manifests:

$ fluxctl install [email protected] [email protected]:berndonline/flux-cd.git --git-path=clusters/gke,common/stage --manifest-generation=true --git-branch=master --namespace=flux --registry-disable-scanning | kubectl apply -f -
deployment.apps/memcached created
service/memcached created
serviceaccount/flux created
clusterrole.rbac.authorization.k8s.io/flux created
clusterrolebinding.rbac.authorization.k8s.io/flux created
deployment.apps/flux created
secret/flux-git-deploy created

After you have applied the configuration, wait until the Flux pods are up and running:

$ kubectl get pods -n flux
NAME                       READY   STATUS    RESTARTS   AGE
flux-85cd9cd746-hnb4f      1/1     Running   0          74m
memcached-5dcd7579-d6vwh   1/1     Running   0          20h

The last step is to get the Flux operator deploy keys and copy the output to add to your Git repository:

fluxctl identity --k8s-fwd-ns flux

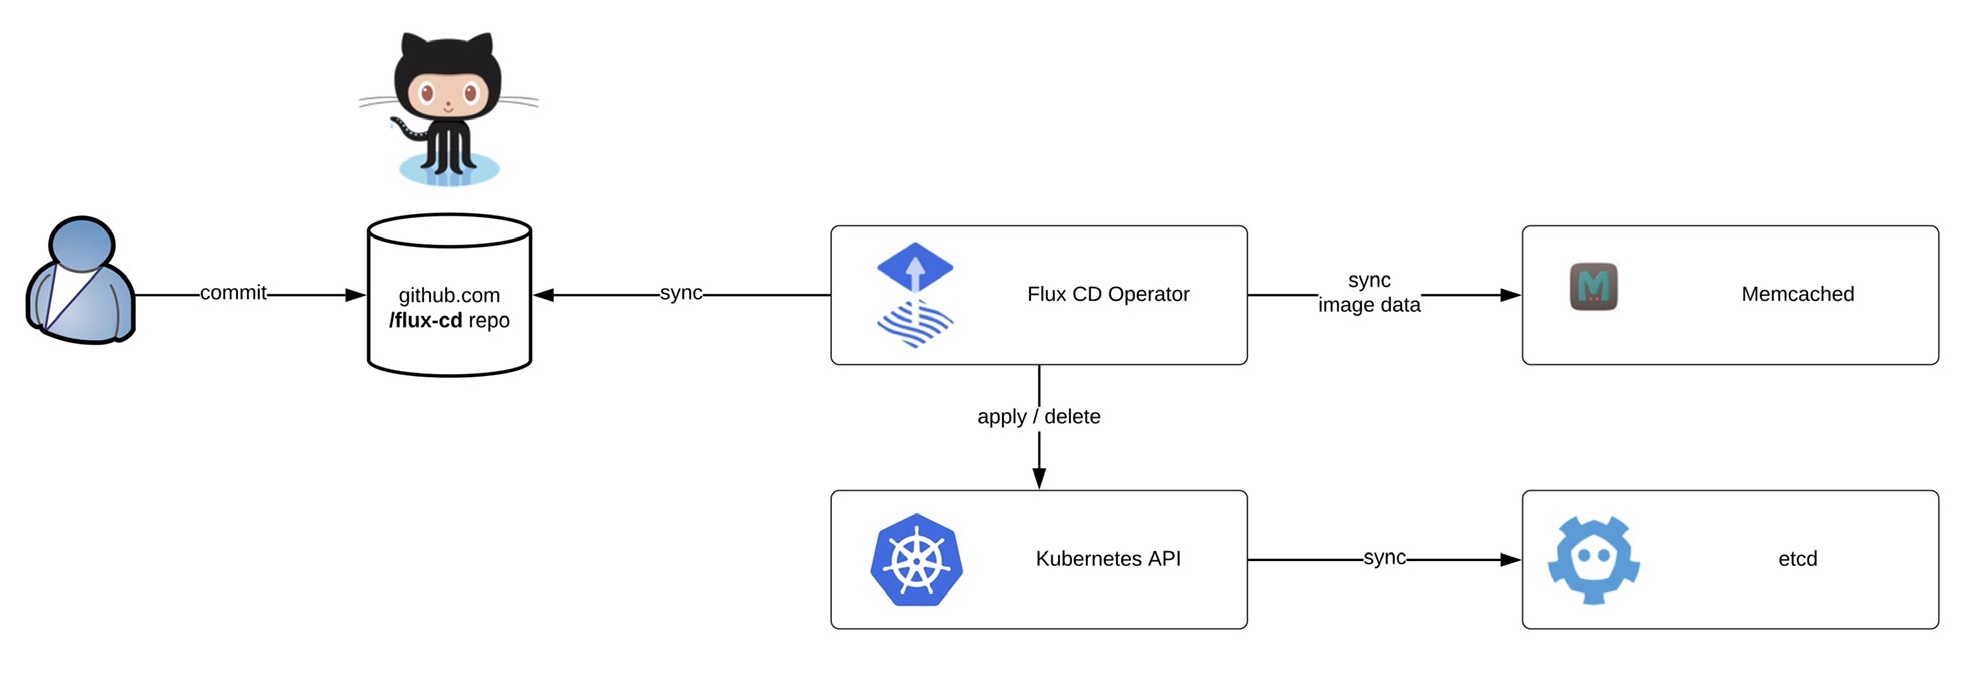
Now you are ready to synchronise the Flux operator with the repository. By default Flux automatically synchronises every 5 minutes to apply configuration changes:

$ fluxctl sync --k8s-fwd-ns flux
Synchronizing with [email protected]:berndonline/flux-cd.git
Revision of master to apply is 726944d
Waiting for 726944d to be applied ...
Done.

You are able to list workloads which are managed by the Flux operator:

$ fluxctl list-workloads --k8s-fwd-ns=flux -a
WORKLOAD                             CONTAINER         IMAGE                            RELEASE  POLICY
default:deployment/hello-kubernetes  hello-kubernetes  paulbouwer/hello-kubernetes:1.5  ready    automated

How do we manage the configuration for multiple Kubernetes clusters?

I want to show you a simple example using Kustomize to manage multiple clusters across two environments (staging and production) with Flux. Basically you have a single repository and multiple clusters synchronising the configuration depending how you configure the –git-path variable of the Flux operator. The option –manifest-generation enables Kustomize for the operator and it is required to add a .flux.yaml to run Kustomize build on the cluster directories and to apply the generated manifests.

Let’s look at the repository file and folder structure. We have the base folder containing the common deployment configuration, the common folder with the environment separation for stage and prod overlays and the clusters folder which contains more cluster specific configuration:

├── .flux.yaml 
├── base
│   └── common
│       ├── deployment.yaml
│       ├── kustomization.yaml
│       ├── namespace.yaml
│       └── service.yaml
├── clusters
│   ├── eks
|   |   ├── eks-app1
│   │   |   ├── deployment.yaml
|   |   |   ├── kustomization.yaml
│   │   |   └── service.yaml
|   |   └── kustomization.yaml
│   ├── gke
|   |   ├── gke-app1
│   │   |   ├── deployment.yaml
|   |   |   ├── kustomization.yaml
│   │   |   └── service.yaml
|   |   ├── gke-app2
│   │   |   ├── deployment.yaml
|   |   |   ├── kustomization.yaml
│   │   |   └── service.yaml
|   |   └── kustomization.yaml
└── common
    ├── prod
    |   ├── prod.yaml
    |   └── kustomization.yaml
    └── stage
        ├──  team1
        |    ├── deployment.yaml
        |    ├── kustomization.yaml
        |    ├── namespace.yaml
        |    └── service.yaml
        ├── stage.yaml
        └── kustomization.yaml

If you are new to Kustomize I would recommend reading the article Kustomize – The right way to do templating in Kubernetes.

The last thing we need to do is to deploy the Flux operator to the two Kubernetes clusters. The only difference between both is the git-path variable which points the operator to the cluster and common directories were Kustomize applies the overlays based what is specified in kustomize.yaml. More details about the configuration you find in my example repository: https://github.com/berndonline/flux-cd

Flux config for Google GKE staging cluster:

fluxctl install [email protected] [email protected]:berndonline/flux-cd.git --git-path=clusters/gke,common/stage --manifest-generation=true --git-branch=master --namespace=flux | kubectl apply -f -

Flux config for Amazon EKS production cluster:

fluxctl install [email protected] [email protected]:berndonline/flux-cd.git --git-path=clusters/eks,common/prod --manifest-generation=true --git-branch=master --namespace=flux | kubectl apply -f -

After a few minutes the configuration is applied to the two clusters and you can validate the configuration.

Google GKE stage workloads:

$ fluxctl list-workloads --k8s-fwd-ns=flux -a
WORKLOAD                   CONTAINER         IMAGE                            RELEASE  POLICY
common:deployment/common   hello-kubernetes  paulbouwer/hello-kubernetes:1.5  ready    automated
default:deployment/gke1    hello-kubernetes  paulbouwer/hello-kubernetes:1.5  ready    
default:deployment/gke2    hello-kubernetes  paulbouwer/hello-kubernetes:1.5  ready    
team1:deployment/team1     hello-kubernetes  paulbouwer/hello-kubernetes:1.5  ready
$ kubectl get svc --all-namespaces | grep LoadBalancer
common        common                 LoadBalancer   10.91.14.186   35.240.53.46     80:31537/TCP    16d
default       gke1                   LoadBalancer   10.91.7.169    35.195.241.46    80:30218/TCP    16d
default       gke2                   LoadBalancer   10.91.10.239   35.195.144.68    80:32589/TCP    16d
team1         team1                  LoadBalancer   10.91.1.178    104.199.107.56   80:31049/TCP    16d

GKE common stage application:

Amazon EKS prod workloads:

$ fluxctl list-workloads --k8s-fwd-ns=flux -a
WORKLOAD                          CONTAINER         IMAGE                                                                RELEASE  POLICY
common:deployment/common          hello-kubernetes  paulbouwer/hello-kubernetes:1.5                                      ready    automated
default:deployment/eks1           hello-kubernetes  paulbouwer/hello-kubernetes:1.5                                      ready
$ kubectl get svc --all-namespaces | grep LoadBalancer
common        common       LoadBalancer   10.100.254.171   a4caafcbf2b2911ea87370a71555111a-958093179.eu-west-1.elb.amazonaws.com    80:32318/TCP    3m8s
default       eks1         LoadBalancer   10.100.170.10    a4caeada52b2911ea87370a71555111a-1261318311.eu-west-1.elb.amazonaws.com   80:32618/TCP    3m8s

EKS common prod application:

I hope this article is useful to get started with GitOps and the Flux operator. In the future, I would like to see Flux being able to watch git tags which will make it easier to promote changes and manage clusters with version tags.

For more technical information have a look at the Flux CD documentation.

Getting started with GKE – Google Kubernetes Engine

I have not spend much time with Google Cloud Platform because I have used mostly AWS cloud services like EKS but I wanted to give Google’s GKE – Kubernetes Engine a try to compare both offerings. My first impression is great about how easy it is to create a cluster and to enable options for NetworkPolicy or Istio Service Mesh without the need to manually install these compare to AWS EKS.

The GKE integration into the cloud offering is perfect, there is no need for a Kubernetes dashboard or custom monitoring / logging solutions, all is nicely integrated into the Google cloud services and can be used straight away once you created the cluster.

I created a new project called Kubernetes for deploying the GKE cluster. The command you see below creates a GKE cluster with the defined settings and options, and I really like the simplicity of a single command to create and manage the cluster similar like eksctl does:

gcloud beta container --project "kubernetes-xxxxxx" clusters create "cluster-1" \
  --region "europe-west1" \
  --no-enable-basic-auth \
  --cluster-version "1.15.4-gke.22" \
  --machine-type "n1-standard-2" \
  --image-type "COS" \
  --disk-type "pd-standard" \
  --disk-size "100" \
  --metadata disable-legacy-endpoints=true \
  --scopes "https://www.googleapis.com/auth/devstorage.read_only","https://www.googleapis.com/auth/logging.write","https://www.googleapis.com/auth/monitoring","https://www.googleapis.com/auth/servicecontrol","https://www.googleapis.com/auth/service.management.readonly","https://www.googleapis.com/auth/trace.append" \
  --num-nodes "1" \
  --enable-stackdriver-kubernetes \
  --enable-ip-alias \
  --network "projects/kubernetes-xxxxxx/global/networks/default" \
  --subnetwork "projects/kubernetes-xxxxxx/regions/europe-west1/subnetworks/default" \
  --default-max-pods-per-node "110" \
  --enable-network-policy \
  --addons HorizontalPodAutoscaling,HttpLoadBalancing,Istio \
  --istio-config auth=MTLS_PERMISSIVE \
  --enable-autoupgrade \
  --enable-autorepair \
  --maintenance-window-start "2019-12-29T00:00:00Z" \
  --maintenance-window-end "2019-12-30T00:00:00Z" \
  --maintenance-window-recurrence "FREQ=WEEKLY;BYDAY=MO,TU,WE,TH,FR,SA,SU" \
  --enable-vertical-pod-autoscaling

With the gcloud command you can authenticate and generate a kubeconfig file for your cluster and start using kubectl directly to deploy your applications.

gcloud beta container clusters get-credentials cluster-1 --region europe-west1 --project kubernetes-xxxxxx

There is no need for a Kubernetes dashboard what I have mentioned because it is integrated into the Google Kubernetes Engine console. You are able to see cluster information and deployed workloads, and you are able to drill down to detailed information about running pods:

Google is offering the Kubernetes control-plane for free and which is a massive advantage for GKE because AWS on the other hand charges for the EKS control-plane around $144 per month.

You can keep your GKE control-plane running and scale down your instance pool to zero if no compute capacity is needed and scale up later if required:

# scale down node pool
gcloud container clusters resize cluster-1 --num-nodes=0 --region "europe-west1"

# scale up node pool 
gcloud container clusters resize cluster-1 --num-nodes=1 --region "europe-west1"

Let’s deploy the Google microservices demo application with Istio Service Mesh enabled:

# label default namespace to inject Envoy sidecar
kubectl label namespace default istio-injection=enabled

# check istio sidecar injector label
kubectl get namespace -L istio-injection

# deploy Google microservices demo manifests
kubectl create -f https://raw.githubusercontent.com/berndonline/microservices-demo/master/kubernetes-manifests/hipster-shop.yml
kubectl create -f https://raw.githubusercontent.com/berndonline/microservices-demo/master/istio-manifests/istio.yml

Get the public IP addresses for the frontend service and ingress gateway to connect with your browser:

# get frontend-external service IP address
kubectl get svc frontend-external --no-headers | awk '{ print $4 }'

# get istio ingress gateway service IP address
kubectl get svc istio-ingressgateway -n istio-system --no-headers | awk '{ print $4 }'

To delete the GKE cluster simply run the following gcloud command:

gcloud beta container --project "kubernetes-xxxxxx" clusters delete "cluster-1" --region "europe-west1"

Googles Kubernetes Engine is in my opinion the better offering compared to AWS EKS which seems a bit too basic.

Create and manage AWS EKS cluster using eksctl command-line

A few month back I stumbled across the Weave.works command-line tool eksctl.io to create and manage AWS EKS clusters. Amazon recently announced eksctl.io is the official command-line tool for managing AWS EKS clusters. It follows a similar approach what we have seen with the new openshift-installer to create an OpenShift 4 cluster or with the Google Cloud Shell to create a GKE cluster with a single command and I really like the simplicity of these tools.

Before we start creating a EKS cluster, see below the IAM user policy to set the required permissions for eksctl.

{
    "Version": "2012-10-17",
    "Statement": [
        {
            "Sid": "VisualEditor0",
            "Effect": "Allow",
            "Action": [
                "iam:CreateInstanceProfile",
                "iam:DeleteInstanceProfile",
                "iam:GetRole",
                "iam:GetInstanceProfile",
                "iam:RemoveRoleFromInstanceProfile",
                "iam:CreateRole",
                "iam:DeleteRole",
                "iam:AttachRolePolicy",
                "iam:PutRolePolicy",
                "iam:ListInstanceProfiles",
                "iam:AddRoleToInstanceProfile",
                "iam:ListInstanceProfilesForRole",
                "iam:PassRole",
                "iam:CreateServiceLinkedRole",
                "iam:DetachRolePolicy",
                "iam:DeleteRolePolicy",
                "iam:DeleteServiceLinkedRole",
                "ec2:DeleteInternetGateway",
                "iam:GetOpenIDConnectProvider",
                "iam:GetRolePolicy"
            ],
            "Resource": [
                "arn:aws:iam::552276840222:instance-profile/eksctl-*",
                "arn:aws:iam::552276840222:oidc-provider/oidc.eks*",
                "arn:aws:iam::552276840222:role/eksctl-*",
                "arn:aws:ec2:*:*:internet-gateway/*"
            ]
        },
        {
            "Sid": "VisualEditor1",
            "Effect": "Allow",
            "Action": [
                "ec2:AuthorizeSecurityGroupIngress",
                "ec2:DeleteSubnet",
                "ec2:AttachInternetGateway",
                "ec2:DeleteRouteTable",
                "ec2:AssociateRouteTable",
                "ec2:DescribeInternetGateways",
                "autoscaling:DescribeAutoScalingGroups",
                "ec2:CreateRoute",
                "ec2:CreateInternetGateway",
                "ec2:RevokeSecurityGroupEgress",
                "autoscaling:UpdateAutoScalingGroup",
                "ec2:DeleteInternetGateway",
                "ec2:DescribeKeyPairs",
                "ec2:DescribeRouteTables",
                "ec2:ImportKeyPair",
                "ec2:DescribeLaunchTemplates",
                "ec2:CreateTags",
                "ec2:CreateRouteTable",
                "ec2:RunInstances",
                "cloudformation:*",
                "ec2:DetachInternetGateway",
                "ec2:DisassociateRouteTable",
                "ec2:RevokeSecurityGroupIngress",
                "ec2:DescribeImageAttribute",
                "ec2:DeleteNatGateway",
                "autoscaling:DeleteAutoScalingGroup",
                "ec2:DeleteVpc",
                "ec2:CreateSubnet",
                "ec2:DescribeSubnets",
                "eks:*",
                "autoscaling:CreateAutoScalingGroup",
                "ec2:DescribeAddresses",
                "ec2:DeleteTags",
                "ec2:CreateNatGateway",
                "autoscaling:DescribeLaunchConfigurations",
                "ec2:CreateVpc",
                "ec2:DescribeVpcAttribute",
                "autoscaling:DescribeScalingActivities",
                "ec2:DescribeAvailabilityZones",
                "ec2:CreateSecurityGroup",
                "ec2:ModifyVpcAttribute",
                "ec2:ReleaseAddress",
                "ec2:AuthorizeSecurityGroupEgress",
                "ec2:DeleteLaunchTemplate",
                "ec2:DescribeTags",
                "ec2:DeleteRoute",
                "ec2:DescribeLaunchTemplateVersions",
                "elasticloadbalancing:*",
                "ec2:DescribeNatGateways",
                "ec2:AllocateAddress",
                "ec2:DescribeSecurityGroups",
                "autoscaling:CreateLaunchConfiguration",
                "ec2:DescribeImages",
                "ec2:CreateLaunchTemplate",
                "autoscaling:DeleteLaunchConfiguration",
                "iam:ListOpenIDConnectProviders",
                "ec2:DescribeVpcs",
                "ec2:DeleteSecurityGroup"
            ],
            "Resource": "*"
        }
    ]
}

Now let’s create the EKS cluster with the following command:

$ eksctl create cluster --name=cluster-1 --region=eu-west-1 --nodes=3 --auto-kubeconfig
[ℹ]  eksctl version 0.10.2
[ℹ]  using region eu-west-1
[ℹ]  setting availability zones to [eu-west-1a eu-west-1c eu-west-1b]
[ℹ]  subnets for eu-west-1a - public:192.168.0.0/19 private:192.168.96.0/19
[ℹ]  subnets for eu-west-1c - public:192.168.32.0/19 private:192.168.128.0/19
[ℹ]  subnets for eu-west-1b - public:192.168.64.0/19 private:192.168.160.0/19
[ℹ]  nodegroup "ng-b17ac84f" will use "ami-059c6874350e63ca9" [AmazonLinux2/1.14]
[ℹ]  using Kubernetes version 1.14
[ℹ]  creating EKS cluster "cluster-1" in "eu-west-1" region
[ℹ]  will create 2 separate CloudFormation stacks for cluster itself and the initial nodegroup
[ℹ]  if you encounter any issues, check CloudFormation console or try 'eksctl utils describe-stacks --region=eu-west-1 --cluster=cluster-1'
[ℹ]  CloudWatch logging will not be enabled for cluster "cluster-1" in "eu-west-1"
[ℹ]  you can enable it with 'eksctl utils update-cluster-logging --region=eu-west-1 --cluster=cluster-1'
[ℹ]  Kubernetes API endpoint access will use default of {publicAccess=true, privateAccess=false} for cluster "cluster-1" in "eu-west-1"
[ℹ]  2 sequential tasks: { create cluster control plane "cluster-1", create nodegroup "ng-b17ac84f" }
[ℹ]  building cluster stack "eksctl-cluster-1-cluster"
[ℹ]  deploying stack "eksctl-cluster-1-cluster"
[ℹ]  building nodegroup stack "eksctl-cluster-1-nodegroup-ng-b17ac84f"
[ℹ]  --nodes-min=3 was set automatically for nodegroup ng-b17ac84f
[ℹ]  --nodes-max=3 was set automatically for nodegroup ng-b17ac84f
[ℹ]  deploying stack "eksctl-cluster-1-nodegroup-ng-b17ac84f"
[✔]  all EKS cluster resources for "cluster-1" have been created
[✔]  saved kubeconfig as "/home/ubuntu/.kube/eksctl/clusters/cluster-1"
[ℹ]  adding identity "arn:aws:iam::xxxxxxxxxx:role/eksctl-cluster-1-nodegroup-ng-b17-NodeInstanceRole-1DK2K493T8OM7" to auth ConfigMap
[ℹ]  nodegroup "ng-b17ac84f" has 0 node(s)
[ℹ]  waiting for at least 3 node(s) to become ready in "ng-b17ac84f"
[ℹ]  nodegroup "ng-b17ac84f" has 3 node(s)
[ℹ]  node "ip-192-168-5-192.eu-west-1.compute.internal" is ready
[ℹ]  node "ip-192-168-62-86.eu-west-1.compute.internal" is ready
[ℹ]  node "ip-192-168-64-47.eu-west-1.compute.internal" is ready
[ℹ]  kubectl command should work with "/home/ubuntu/.kube/eksctl/clusters/cluster-1", try 'kubectl --kubeconfig=/home/ubuntu/.kube/eksctl/clusters/cluster-1 get nodes'
[✔]  EKS cluster "cluster-1" in "eu-west-1" region is ready

Alternatively there is the option to create the EKS cluster in an existing VPC without eksctl creating the full-stack, you are required to specify the subnet IDs for private and public subnets:

eksctl create cluster --name=cluster-1 --region=eu-west-1 --nodes=3 \
       --vpc-private-subnets=subnet-0ff156e0c4a6d300c,subnet-0426fb4a607393184,subnet-0426fb4a604827314 \
       --vpc-public-subnets=subnet-0153e560b3129a696,subnet-009fa0199ec203c37,subnet-0426fb4a412393184

The option –auto-kubeconfig stores the kubeconfig under the users home directory in ~/.kube/eksctl/clusters/<-cluster-name-> or you can obtain cluster credentials at any point in time with the following command:

$ eksctl utils write-kubeconfig --cluster=cluster-1
[ℹ]  eksctl version 0.10.2
[ℹ]  using region eu-west-1
[✔]  saved kubeconfig as "/home/ubuntu/.kube/config"

Using kubectl to connect and manage the EKS cluster:

$ kubectl get nodes
NAME                                          STATUS   ROLES    AGE     VERSION
ip-192-168-5-192.eu-west-1.compute.internal   Ready    <none>   3m42s   v1.14.7-eks-1861c5
ip-192-168-62-86.eu-west-1.compute.internal   Ready    <none>   3m43s   v1.14.7-eks-1861c5
ip-192-168-64-47.eu-west-1.compute.internal   Ready    <none>   3m41s   v1.14.7-eks-1861c5

You are able to view the created EKS clusters:

$ eksctl get clusters
NAME		REGION
cluster-1	eu-west-1

As easy it is to create an EKS cluster you can also delete the cluster with a single command:

$ eksctl delete cluster --name=cluster-1 --region=eu-west-1
[ℹ]  eksctl version 0.10.2
[ℹ]  using region eu-west-1
[ℹ]  deleting EKS cluster "cluster-1"
[✔]  kubeconfig has been updated
[ℹ]  cleaning up LoadBalancer services
[ℹ]  2 sequential tasks: { delete nodegroup "ng-b17ac84f", delete cluster control plane "cluster-1" [async] }
[ℹ]  will delete stack "eksctl-cluster-1-nodegroup-ng-b17ac84f"
[ℹ]  waiting for stack "eksctl-cluster-1-nodegroup-ng-b17ac84f" to get deleted
[ℹ]  will delete stack "eksctl-cluster-1-cluster"
[✔]  all cluster resources were deleted

I can only recommend checking out eksctl.io because it has lot of potentials and the move towards an GitOps model to manage EKS clusters in a declarative way using a cluster manifests or hopefully in the future an eksctld operator to do the job. RedHat is working on a similar tool for OpenShift 4 called OpenShift Hive which I will write about very soon.