Ansible Playbook to deploy AVI Controller and Service Engines

After my first blog post about Software defined Load Balancing with AVI Networks, here is how to automatically deploy AVI controller and services engines via Ansible.

Here are the links to my repositories; AVI Vagrant environment: https://github.com/berndonline/avi-lab-vagrant and AVI Ansible Playbook: https://github.com/berndonline/avi-lab-provision

Make sure that your vagrant environment is running,

berndonline@lab:~/avi-lab-vagrant$ vagrant status
Current machine states:

avi-controller-1          running (libvirt)
avi-controller-2          running (libvirt)
avi-controller-3          running (libvirt)
avi-se-1                  running (libvirt)
avi-se-2                  running (libvirt)

This environment represents multiple VMs. The VMs are all listed
above with their current state. For more information about a specific
VM, run `vagrant status NAME`.

I needed to modify the ansible.cfg to integrate a filter plugin:

[defaults]
inventory = ./.vagrant/provisioners/ansible/inventory/vagrant_ansible_inventory
host_key_checking=False

library = /home/berndonline/avi-lab-provision/lib
filter_plugins = /home/berndonline/avi-lab-provision/lib/filter_plugins

The controller installation is actually very simple and I got it from the official AVI ansible role they created, I added a second role to check ones the controller nodes are successfully booted:

---
- hosts: avi-controller
  user: '{{ ansible_ssh_user }}'
  gather_facts: "true"
  roles:
    - {role: ansible-role-avicontroller, become: true}
    - {role: avi-post-controller, become: false}

There’s one important thing to know before we run the playbook. When you have an AVI subscription you get custom container images with a predefined default password which makes it easier for you to do the cluster setup fully automated. You find the default password variable in group_vars/all.yml there you set as well if the password should be changed.

Let’s execute the ansible playbook, it takes a bit time for the three nodes to boot up:

berndonline@lab:~/avi-lab-vagrant$ ansible-playbook ../avi-lab-provision/playbooks/avi-controller-install.yml

PLAY [avi-controller] *********************************************************************************************************************************************

TASK [Gathering Facts] ********************************************************************************************************************************************
ok: [avi-controller-3]
ok: [avi-controller-2]
ok: [avi-controller-1]

TASK [ansible-role-avicontroller : Avi Controller | Deployment] ***************************************************************************************************
included: /home/berndonline/avi-lab-provision/roles/ansible-role-avicontroller/tasks/docker/main.yml for avi-controller-1, avi-controller-2, avi-controller-3

TASK [ansible-role-avicontroller : Avi Controller | Services | systemd | Check if Avi Controller installed] *******************************************************
included: /home/berndonline/avi-lab-provision/roles/ansible-role-avicontroller/tasks/docker/services/systemd/check.yml for avi-controller-1, avi-controller-2, avi-controller-3

TASK [ansible-role-avicontroller : Avi Controller | Check if Avi Controller installed] ****************************************************************************
ok: [avi-controller-3]
ok: [avi-controller-2]
ok: [avi-controller-1]

TASK [ansible-role-avicontroller : Avi Controller | Services | init.d | Check if Avi Controller installed] ********************************************************
skipping: [avi-controller-1]
skipping: [avi-controller-2]
skipping: [avi-controller-3]

TASK [ansible-role-avicontroller : Avi Controller | Check minimum requirements] ***********************************************************************************
included: /home/berndonline/avi-lab-provision/roles/ansible-role-avicontroller/tasks/docker/requirements.yml for avi-controller-1, avi-controller-2, avi-controller-3

TASK [ansible-role-avicontroller : Avi Controller | Requirements | Check for docker] ******************************************************************************
ok: [avi-controller-2]
ok: [avi-controller-3]
ok: [avi-controller-1]

...

TASK [avi-post-controller : wait for cluster nodes up] ************************************************************************************************************
FAILED - RETRYING: wait for cluster nodes up (30 retries left).

...

FAILED - RETRYING: wait for cluster nodes up (7 retries left).
FAILED - RETRYING: wait for cluster nodes up (8 retries left).
FAILED - RETRYING: wait for cluster nodes up (7 retries left).
ok: [avi-controller-2]
ok: [avi-controller-3]
ok: [avi-controller-1]

PLAY RECAP ********************************************************************************************************************************************************
avi-controller-1           : ok=36   changed=6    unreachable=0    failed=0
avi-controller-2           : ok=35   changed=5    unreachable=0    failed=0
avi-controller-3           : ok=35   changed=5    unreachable=0    failed=0

berndonline@lab:~/avi-lab-vagrant$

We are not finished yet and need to set basic settings like NTP and DNS, and need to configure the AVI three node controller cluster with another playbook:

---
- hosts: localhost
  connection: local
  roles:
    - {role: avi-cluster-setup, become: false}
    - {role: avi-change-password, become: false, when: avi_change_password == true}

The first role uses the REST API to do the configuration changes and requires the AVI ansible sdk role and for these reason it is very useful using the custom subscription images because you know the default password otherwise you need to modify the main setup.json file.

Let’s run the AVI cluster setup playbook:

berndonline@lab:~/avi-lab-vagrant$ ansible-playbook ../avi-lab-provision/playbooks/avi-cluster-setup.yml

PLAY [localhost] **************************************************************************************************************************************************

TASK [Gathering Facts] ********************************************************************************************************************************************
ok: [localhost]

TASK [ansible-role-avisdk : Checking if avisdk python library is present] *****************************************************************************************
ok: [localhost] => {
    "msg": "Please make sure avisdk is installed via pip. 'pip install avisdk --upgrade'"
}

TASK [avi-cluster-setup : set AVI dns and ntp facts] **************************************************************************************************************
ok: [localhost]

TASK [avi-cluster-setup : set AVI cluster facts] ******************************************************************************************************************
ok: [localhost]

TASK [avi-cluster-setup : configure ntp and dns controller nodes] *************************************************************************************************
changed: [localhost]

TASK [avi-cluster-setup : configure AVI cluster] ******************************************************************************************************************
changed: [localhost]

TASK [avi-cluster-setup : wait for cluster become active] *********************************************************************************************************
FAILED - RETRYING: wait for cluster become active (30 retries left).
FAILED - RETRYING: wait for cluster become active (29 retries left).
FAILED - RETRYING: wait for cluster become active (28 retries left).

...

FAILED - RETRYING: wait for cluster become active (14 retries left).
FAILED - RETRYING: wait for cluster become active (13 retries left).
FAILED - RETRYING: wait for cluster become active (12 retries left).
ok: [localhost]

TASK [avi-change-password : change default admin password on cluster build when subscription] *********************************************************************
skipping: [localhost]

PLAY RECAP ********************************************************************************************************************************************************
localhost                  : ok=7    changed=2    unreachable=0    failed=0

berndonline@lab:~/avi-lab-vagrant$

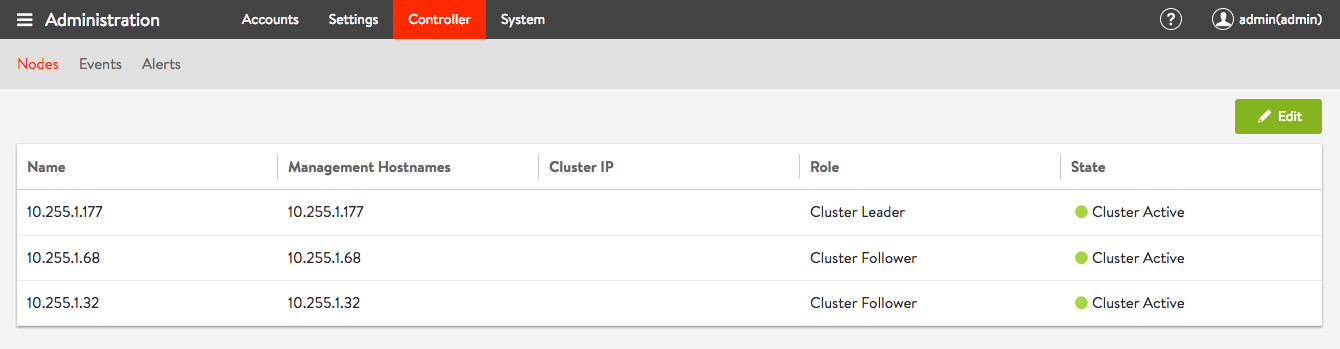
We can check in the web console to see if the cluster is booted and correctly setup:

Last but not least we need the ansible playbook for the AVI service engines installation which relies on the official AVI ansible se role:

---
- hosts: avi-se
  user: '{{ ansible_ssh_user }}'
  gather_facts: "true"
  roles:
    - {role: ansible-role-avise, become: true}

Let’s run the playbook for the service engines installation:

berndonline@lab:~/avi-lab-vagrant$ ansible-playbook ../avi-lab-provision/playbooks/avi-se-install.yml

PLAY [avi-se] *****************************************************************************************************************************************************

TASK [Gathering Facts] ********************************************************************************************************************************************
ok: [avi-se-2]
ok: [avi-se-1]

TASK [ansible-role-avisdk : Checking if avisdk python library is present] *****************************************************************************************
ok: [avi-se-1] => {
    "msg": "Please make sure avisdk is installed via pip. 'pip install avisdk --upgrade'"
}
ok: [avi-se-2] => {
    "msg": "Please make sure avisdk is installed via pip. 'pip install avisdk --upgrade'"
}

TASK [ansible-role-avise : Avi SE | Set facts] ********************************************************************************************************************
skipping: [avi-se-1]
skipping: [avi-se-2]

TASK [ansible-role-avise : Avi SE | Deployment] *******************************************************************************************************************
included: /home/berndonline/avi-lab-provision/roles/ansible-role-avise/tasks/docker/main.yml for avi-se-1, avi-se-2

TASK [ansible-role-avise : Avi SE | Check minimum requirements] ***************************************************************************************************
included: /home/berndonline/avi-lab-provision/roles/ansible-role-avise/tasks/docker/requirements.yml for avi-se-1, avi-se-2

TASK [ansible-role-avise : Avi SE | Requirements | Check for docker] **********************************************************************************************
ok: [avi-se-2]
ok: [avi-se-1]

TASK [ansible-role-avise : Avi SE | Requirements | Set facts] *****************************************************************************************************
ok: [avi-se-1]
ok: [avi-se-2]

TASK [ansible-role-avise : Avi SE | Requirements | Validate Parameters] *******************************************************************************************
ok: [avi-se-1] => {
    "changed": false,
    "msg": "All assertions passed"
}
ok: [avi-se-2] => {
    "changed": false,
    "msg": "All assertions passed"
}

...

TASK [ansible-role-avise : Avi SE | Services | systemd | Start the service since it's not running] ****************************************************************
changed: [avi-se-1]
changed: [avi-se-2]

RUNNING HANDLER [ansible-role-avise : Avi SE | Services | systemd | Daemon reload] ********************************************************************************
ok: [avi-se-2]
ok: [avi-se-1]

RUNNING HANDLER [ansible-role-avise : Avi SE | Services | Restart the avise service] ******************************************************************************
changed: [avi-se-2]
changed: [avi-se-1]

PLAY RECAP ********************************************************************************************************************************************************
avi-se-1                   : ok=47   changed=7    unreachable=0    failed=0
avi-se-2                   : ok=47   changed=7    unreachable=0    failed=0

berndonline@lab:~/avi-lab-vagrant$

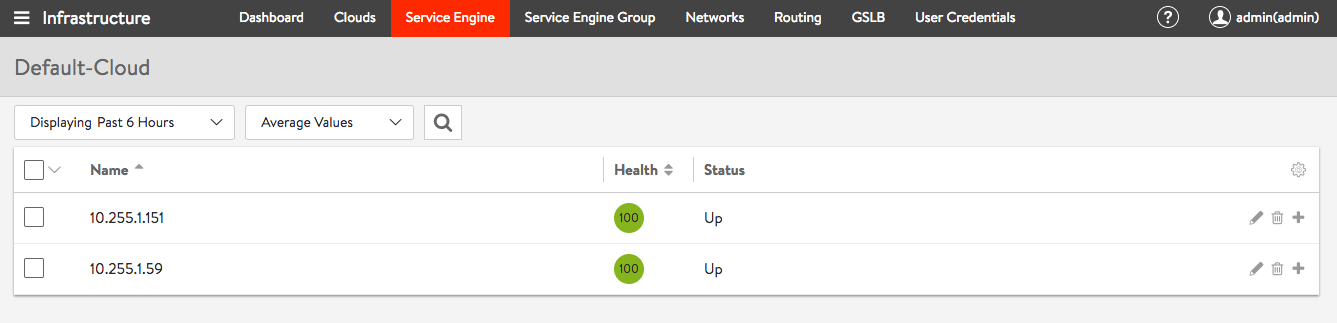
After a few minutes you see the AVI service engines automatically register on the controller cluster and you are ready start configuring the detailed load balancing configuration:

Please share your feedback and leave a comment.

Getting started with Jenkins for Network Automation

As I have mentioned my previous post about Getting started with Gitlab-CI for Network Automation, Jenkins is another continuous integration pipelining tool you can use for network automation. Have a look about how to install Jenkins: https://wiki.jenkins.io/display/JENKINS/Installing+Jenkins+on+Ubuntu

To use the Jenkins with Vagrant and KVM (libvirt) there are a few changes needed on the linux server similar with the Gitlab-Runner. The Jenkins user account needs to be able to control KVM and you need to install the vagrant-libvirt plugin:

usermod -aG libvirtd jenkins
sudo su jenkins
vagrant plugin install vagrant-libvirt

Optional: you may need to copy custom Vagrant boxes into the users vagrant folder ‘/var/lib/jenkins/.vagrant.d/boxes/*’. Note that the Jenkins home directory is not located under /home.

Now lets start configuring a Jenkins CI-pipeline, click on ‘New item’:

This creates an empty pipeline where you need to add the different stages  of what needs to be executed:

Below is an example Jenkins pipeline script which is very similar to the Gitlab-CI pipeline I have used with my Cumulus Linux Lab in the past.

pipeline {
    agent any
    stages {
        stage('Clean and prep workspace') {
            steps {
                sh 'rm -r *'
                git 'https://github.com/berndonline/cumulus-lab-provision'
                sh 'git clone --origin master https://github.com/berndonline/cumulus-lab-vagrant'
            }
        }
        stage('Validate Ansible') {
            steps {
                sh 'bash ./linter.sh'
            }
        }
        stage('Staging') {
            steps {
                sh 'cd ./cumulus-lab-vagrant/ && ./vagrant_create.sh'
                sh 'cd ./cumulus-lab-vagrant/ && bash ../staging.sh'
            }
        }
        stage('Deploy production approval') {
            steps {
                input 'Deploy to prod?'
            }
        }
        stage('Production') {
            steps {
                sh 'cd ./cumulus-lab-vagrant/ && ./vagrant_create.sh'
                sh 'cd ./cumulus-lab-vagrant/ && bash ../production.sh'
            }
        }
    }
}

Let’s run the build pipeline:

The stages get executed one by one and, as you can see below, the production stage has an manual approval build-in that nothing gets deployed to production without someone to approve before, for a controlled production deployment:

Finished pipeline:

This is just a simple example of a network automation pipeline, this can of course be more complex if needed. It should just help you a bit on how to start using Jenkins for network automation.

Please share your feedback and leave a comment.

Ansible Automation with Cisco ASA Multi-Context Mode

I thought I’d share my experience using Ansible and Cisco ASA firewalls in multi-context mode. Right from the beginning I had a few issues deploying the configuration and the switch between the different security context didn’t work well. I got the error you see below when I tried to run a playbook. Other times the changeto context didn’t work well and applied the wrong config:

berndonline@lab:~$ ansible-playbook -i inventory site.yml --ask-vault-pass
Vault password:

PLAY [all] ***************************************************************************************************************************************************************************

TASK [hostname : set dns and hostname] ***********************************************************************************************************************************************
An exception occurred during task execution. To see the full traceback, use -vvv. The error was: error: [Errno 61] Connection refused
fatal: [fwcontext01]: FAILED! => {"changed": false, "err": "[Errno 61] Connection refused", "msg": "unable to connect to socket"}
ok: [fwcontext02]

TASK [interfaces : write interfaces config] ******************************************************************************************************************************************
ok: [fwcontext02]

....

After a bit of troubleshooting I found a workaround to limit the amount of processes Ansible use and set this limit to one in the Ansible.cfg. The default is five processes if forks is not defined as far as I remember.

[defaults]
inventory = ./inventory
host_key_checking=False
jinja2_extensions=jinja2.ext.do
forks = 1

In the example inventory file, the “inventory_hostname” variable represents the security context and as you see the “ansible_ssh_host” is set to the IP address of the admin context:

fwcontext01 ansible_ssh_host=192.168.0.1 ansible_ssh_port=22 ansible_ssh_user='ansible' ansible_ssh_pass='cisco'
fwcontext02 ansible_ssh_host=192.168.0.1 ansible_ssh_port=22 ansible_ssh_user='ansible' ansible_ssh_pass='cisco'

When you run the playbook again you can see that the playbook runs successfully but deploys the changes one by one to each firewall security context, the disadvantage is that the playbook takes much longer to run:

berndonline@lab:~$ ansible-playbook site.yml

PLAY [all] ***************************************************************************************************************************************************************************

TASK [hostname : set dns and hostname] ***********************************************************************************************************************************************
ok: [fwcontext01]
ok: [fwcontext02]

TASK [interfaces : write interfaces config] ******************************************************************************************************************************************
ok: [fwcontext01]
ok: [fwcontext02]

Example site.yml

---

- hosts: all
  connection: local
  gather_facts: 'no'

  vars:
    cli:
      username: "{{ ansible_ssh_user }}"
      password: "{{ ansible_ssh_pass }}"
      host: "{{ ansible_ssh_host }}"

  roles:
    - interfaces

In the example Interface role you see that the context is set to “inventory_hostname” variable:

---

- name: write interfaces config
  asa_config:
    src: "templates/interfaces.j2"
    provider: "{{ cli }}"
    context: "{{ inventory_hostname }}"
  register: result

- name: enable interfaces
  asa_config:
    parents: "interface {{ item.0 }}"
    lines: "no shutdown"
    match: none
    provider: "{{ cli }}"
    context: "{{ inventory_hostname }}"
  when: result.changed
  with_items:
    - "{{ interfaces.items() }}"

After modifying the forks, the Ansible playbook runs well with Cisco ASA in multi-context mode, like mentioned before it is a bit slow to deploy the configuration if I compare this to Cumulus Linux or any other Linux system.

Please share your feedback.

Leave a comment

Getting started with Gitlab-CI for Network Automation

Ken Murphy from networkautomationblog.com asked me to do a more detailed post about how to setup Gitlab-Runner on your local server to use with Gitlab-CI. I will not get into too much detail about the installation because Gitlab has a very detailed information about it which you can find here: https://docs.gitlab.com/runner/install/linux-repository.html

Once the Gitlab Runner is installed on your server you need to configure and register the runner with your Gitlab repo. If you are interested in information about this, you can find the documentation here: https://docs.gitlab.com/runner/register/ but lets continue with how to register the runner.

In your project go to ‘Settings -> CI / CD’ to find the registration token:

It is important to disable the shared runners:

Now let’s register the gitlab runner:

berndonline@lab ~ # sudo gitlab-runner register
Running in system-mode.

Please enter the gitlab-ci coordinator URL (e.g. https://gitlab.com/):
https://gitlab.com
Please enter the gitlab-ci token for this runner:
xxxxxxxxx
Please enter the gitlab-ci description for this runner:
[lab]:
Please enter the gitlab-ci tags for this runner (comma separated):
lab
Whether to run untagged builds [true/false]:
[false]: true
Whether to lock the Runner to current project [true/false]:
[true]: false
Registering runner... succeeded                     runner=xxxxx
Please enter the executor: docker-ssh, parallels, ssh, virtualbox, kubernetes, docker, shell, docker+machine, docker-ssh+machine:
shell
Runner registered successfully. Feel free to start it, but if it's running already the config should be automatically reloaded!
berndonline@lab ~ #

You will find the main configuration file under /etc/gitlab-runner/config.toml.

When everything goes well the runner is registered and active, and ready to apply the CI pipeline what is defined in the .gitlab-ci.yml.

To use the runner with Vagrant and KVM (libvirt) there are a few changes needed on the linux server itself, first the gitlab-runner user account needs to be able to control KVM, second the vagrant-libvirt plugin needs to be installed:

usermod -aG libvirtd gitlab-runner
sudo su gitlab-runner
vagrant plugin install vagrant-libvirt

Optional: you may need to copy custom Vagrant boxes into the users vagrant folder ‘/home/gitlab-runner/.vagrant.d/boxes/*’.

Here the example from my Cumulus CI-pipeline .gitlab-ci.yml that I have already shared in my other blog post about Continuous Integration and Delivery for Networking with Cumulus Linux:

---
stages:
    - validate ansible
    - staging
    - production
validate:
    stage: validate ansible
    script:
        - bash ./linter.sh
staging:
    before_script:
        - git clone https://github.com/berndonline/cumulus-lab-vagrant.git
        - cd cumulus-lab-vagrant/
        - python ./topology_converter.py ./topology-production.dot
          -p libvirt --ansible-hostfile
    stage: staging
    script:
        - bash ../staging.sh
production:
    before_script:
        - git clone https://github.com/berndonline/cumulus-lab-vagrant.git
        - cd cumulus-lab-vagrant/
        - python ./topology_converter.py ./topology-production.dot
          -p libvirt --ansible-hostfile
    stage: production
    when: manual
    script:
        - bash ../production.sh
    only:
        - master

The next step is the staging.sh shell script which boots up the vagrant instances and executes the Ansible playbooks. It is better to use a script and report the exit state so that if something goes wrong the Vagrant instances are correctly destroyed.

#!/bin/bash

EXIT=0
vagrant up mgmt-1 --color <<< 'mgmt-1 boot' || EXIT=$?
vagrant up netq-1 --color <<< 'netq-1 boot' || EXIT=$?
sleep 300
vagrant up spine-1 --color <<< 'spine-1 boot' || EXIT=$?
vagrant up spine-2 --color <<< 'spine-2 boot' || EXIT=$?
sleep 60
vagrant up edge-1 --color <<< 'edge-1 boot' || EXIT=$?
vagrant up edge-2 --color <<< 'edge-2 boot' || EXIT=$?
sleep 60
vagrant up leaf-1 --color <<< 'leaf-1 boot' || EXIT=$?
vagrant up leaf-2 --color <<< 'leaf-2 boot' || EXIT=$?
vagrant up leaf-3 --color <<< 'leaf-3 boot' || EXIT=$?
vagrant up leaf-4 --color <<< 'leaf-4 boot' || EXIT=$?
vagrant up leaf-5 --color <<< 'leaf-5 boot' || EXIT=$?
vagrant up leaf-6 --color <<< 'leaf-6 boot' || EXIT=$?
sleep 60
vagrant up server-1 --color <<< 'server-1 boot' || EXIT=$?
vagrant up server-2 --color <<< 'server-2 boot' || EXIT=$?
vagrant up server-3 --color <<< 'server-3 boot' || EXIT=$?
vagrant up server-4 --color <<< 'server-4 boot' || EXIT=$?
vagrant up server-5 --color <<< 'server-5 boot' || EXIT=$?
vagrant up server-6 --color <<< 'server-6 boot' || EXIT=$?
sleep 60
export ANSIBLE_FORCE_COLOR=true
ansible-playbook ./helper_scripts/configure_servers.yml <<< 'ansible playbook' || EXIT=$?
ansible-playbook ../site.yml <<< 'ansible playbook' || EXIT=$?
sleep 60
ansible-playbook ../icmp_check.yml <<< 'icmp check' || EXIT=$?
vagrant destroy -f
echo $EXIT
exit $EXIT

Basically any change in the repository triggers the .gitlab-ci.yml and executes the pipeline; starting with the stage validating the Ansible syntax:

Continue with staging the configuration and deploying to production. The production stage is a manual trigger to have a controlled deployment:

In one of my next posts I will explain how to use Jenkins instead of Gitlab-CI for Network Automation. Jenkins is very similar to the runner but more flexible with what you can do with it.

Leave a comment

Ansible Playbook for VyOS and BGP Routing

I am currently looking into different possibilities for Open Source alternatives to commercial routers from Cisco or Juniper to use in Amazon AWS Transit VPCs. One option is to completely build the software router by myself with a Debian Linux, FRR (Free Range Routing) and StrongSwan, read my post about the self-build software router: Open Source Routing GRE over IPSec with StrongSwan and Cisco IOS-XE

A few years back I was working with Juniper JunOS routers and I thought I’d give VyOS a try because the command line which is very similar.

I replicated the same Vagrant topology for my Ansible Playbook for Cisco BGP Routing Topology but used VyOS instead of Cisco.

Network overview:

Here are the repositories for the Vagrant topology https://github.com/berndonline/vyos-lab-vagrant and the Ansible Playbook https://github.com/berndonline/vyos-lab-provision.

The Ansible Playbook site.yml is very simple, using the Ansible vyos_system for changing the hostname and the module vyos_config for interface and routing configuration:

---

- hosts: all

  connection: local
  user: '{{ ansible_ssh_user }}'
  gather_facts: 'no'

  roles:
    - hostname
    - interfaces
    - routing

Here is an example from host_vars rtr-1.yml:

---

hostname: rtr-1
domain_name: lab.local

loopback:
  dum0:
    alias: dummy loopback0
    address: 10.255.0.1
    mask: /32

interfaces:
  eth1:
    alias: connection rtr-2
    address: 10.0.255.1
    mask: /30

  eth2:
    alias: connection rtr-3
    address: 10.0.255.5
    mask: /30

bgp:
  asn: 65001
  neighbor:
    - {address: 10.0.255.2, remote_as: 65000}
    - {address: 10.0.255.6, remote_as: 65000}
  networks:
    - {network: 10.0.255.0, mask: /30}
    - {network: 10.0.255.4, mask: /30}
    - {network: 10.255.0.1, mask: /32}
  maxpath: 2

The template interfaces.j2 for the interface configuration:

{% if loopback is defined %}
{% for port, value in loopback.items() %}
set interfaces dummy {{ port }} address '{{ value.address }}{{ value.mask }}'
set interfaces dummy {{ port }} description '{{ value.alias }}'
{% endfor %}
{% endif %}

{% if interfaces is defined %}
{% for port, value in interfaces.items() %}
set interfaces ethernet {{ port }} address '{{ value.address }}{{ value.mask }}'
set interfaces ethernet {{ port }} description '{{ value.alias }}'
{% endfor %}
{% endif %}

This is the template routing.j2 for the routing configuration:

{% if bgp is defined %}
{% if bgp.maxpath is defined %}
set protocols bgp {{ bgp.asn }} maximum-paths ebgp '{{ bgp.maxpath }}'
{% endif %}
{% for item in bgp.neighbor %}
set protocols bgp {{ bgp.asn }} neighbor {{ item.address }} ebgp-multihop '2'
set protocols bgp {{ bgp.asn }} neighbor {{ item.address }} remote-as '{{ item.remote_as }}'
{% endfor %}
{% for item in bgp.networks %}
set protocols bgp {{ bgp.asn }} network '{{ item.network }}{{ item.mask }}'
{% endfor %}
set protocols bgp {{ bgp.asn }} parameters router-id '{{ loopback.dum0.address }}'
{% endif %}

The output of the running Ansible Playbook:

PLAY [all] *********************************************************************

TASK [hostname : write hostname and domain-name] *******************************
changed: [rtr-3]
changed: [rtr-2]
changed: [rtr-4]
changed: [rtr-1]

TASK [interfaces : write interfaces config] ************************************
changed: [rtr-4]
changed: [rtr-1]
changed: [rtr-3]
changed: [rtr-2]

TASK [routing : write routing config] ******************************************
changed: [rtr-2]
changed: [rtr-4]
changed: [rtr-3]
changed: [rtr-1]

PLAY RECAP *********************************************************************
rtr-1                      : ok=3    changed=3    unreachable=0    failed=0   
rtr-2                      : ok=3    changed=3    unreachable=0    failed=0   
rtr-3                      : ok=3    changed=3    unreachable=0    failed=0   
rtr-4                      : ok=3    changed=3    unreachable=0    failed=0   

Like in all my other Ansible Playbooks I use some kind of validation, a simple ping check vyos_check_icmp.yml to see if the configuration is correctly deployed:

---

- hosts: all

  connection: local
  user: '{{ ansible_ssh_user }}'
  gather_facts: 'no'

  tasks:
    - name: validate connection from rtr-1
      vyos_command:
        commands: 'ping {{ item }} count 4'
      when: "'rtr-1' in inventory_hostname"
      with_items:
        - '10.0.255.2'
        - '10.0.255.6'

    - name: validate connection from rtr-2
      vyos_command:
        commands: 'ping {{ item }} count 4'
      when: "'rtr-2' in inventory_hostname"
      with_items:
        - '10.0.255.1'
        - '10.0.254.1'
        - '10.0.253.2'
...

The output of the icmp validation Playbook:

PLAY [all] *********************************************************************

TASK [validate connection from rtr-1] ******************************************
skipping: [rtr-3] => (item=10.0.255.2) 
skipping: [rtr-3] => (item=10.0.255.6) 
skipping: [rtr-2] => (item=10.0.255.2) 
skipping: [rtr-2] => (item=10.0.255.6) 
skipping: [rtr-4] => (item=10.0.255.2) 
skipping: [rtr-4] => (item=10.0.255.6) 
ok: [rtr-1] => (item=10.0.255.2)
ok: [rtr-1] => (item=10.0.255.6)

TASK [validate connection from rtr-2] ******************************************
skipping: [rtr-3] => (item=10.0.255.1) 
skipping: [rtr-3] => (item=10.0.254.1) 
skipping: [rtr-1] => (item=10.0.255.1) 
skipping: [rtr-3] => (item=10.0.253.2) 
skipping: [rtr-1] => (item=10.0.254.1) 
skipping: [rtr-1] => (item=10.0.253.2) 
skipping: [rtr-4] => (item=10.0.255.1) 
skipping: [rtr-4] => (item=10.0.254.1) 
skipping: [rtr-4] => (item=10.0.253.2) 
ok: [rtr-2] => (item=10.0.255.1)
ok: [rtr-2] => (item=10.0.254.1)
ok: [rtr-2] => (item=10.0.253.2)

TASK [validate connection from rtr-3] ******************************************
skipping: [rtr-1] => (item=10.0.255.5) 
skipping: [rtr-1] => (item=10.0.254.5) 
skipping: [rtr-2] => (item=10.0.255.5) 
skipping: [rtr-1] => (item=10.0.253.1) 
skipping: [rtr-2] => (item=10.0.254.5) 
skipping: [rtr-2] => (item=10.0.253.1) 
skipping: [rtr-4] => (item=10.0.255.5) 
skipping: [rtr-4] => (item=10.0.254.5) 
skipping: [rtr-4] => (item=10.0.253.1) 
ok: [rtr-3] => (item=10.0.255.5)
ok: [rtr-3] => (item=10.0.254.5)
ok: [rtr-3] => (item=10.0.253.1)

TASK [validate connection from rtr-4] ******************************************
skipping: [rtr-3] => (item=10.0.254.2) 
skipping: [rtr-3] => (item=10.0.254.6) 
skipping: [rtr-1] => (item=10.0.254.2) 
skipping: [rtr-1] => (item=10.0.254.6) 
skipping: [rtr-2] => (item=10.0.254.2) 
skipping: [rtr-2] => (item=10.0.254.6) 
ok: [rtr-4] => (item=10.0.254.2)
ok: [rtr-4] => (item=10.0.254.6)

TASK [validate bgp connection from rtr-1] **************************************
skipping: [rtr-3] => (item=10.255.0.4) 
skipping: [rtr-2] => (item=10.255.0.4) 
skipping: [rtr-4] => (item=10.255.0.4) 
ok: [rtr-1] => (item=10.255.0.4)

TASK [validate bgp connection from rtr-4] **************************************
skipping: [rtr-3] => (item=10.255.0.1) 
skipping: [rtr-1] => (item=10.255.0.1) 
skipping: [rtr-2] => (item=10.255.0.1) 
ok: [rtr-4] => (item=10.255.0.1)

PLAY RECAP *********************************************************************
rtr-1                      : ok=2    changed=0    unreachable=0    failed=0   
rtr-2                      : ok=1    changed=0    unreachable=0    failed=0   
rtr-3                      : ok=1    changed=0    unreachable=0    failed=0   
rtr-4                      : ok=2    changed=0    unreachable=0    failed=0   

As you see, the configuration is successfully deployed and BGP connectivity between the nodes.

Leave a comment